I wouldn’t blame anyone for thinking that draw boring is one of those traditional techniques kept alive only as an ambition for keeping the old stuff in use. After all I’m sure there could be arguement to say that with our good modern glues teamed with the accessibility of descent clamps we just don’t need to put in the extra effort. Or, if you do fancy some reinforcement why not just glue, clamp and then drill through for the pegs together?
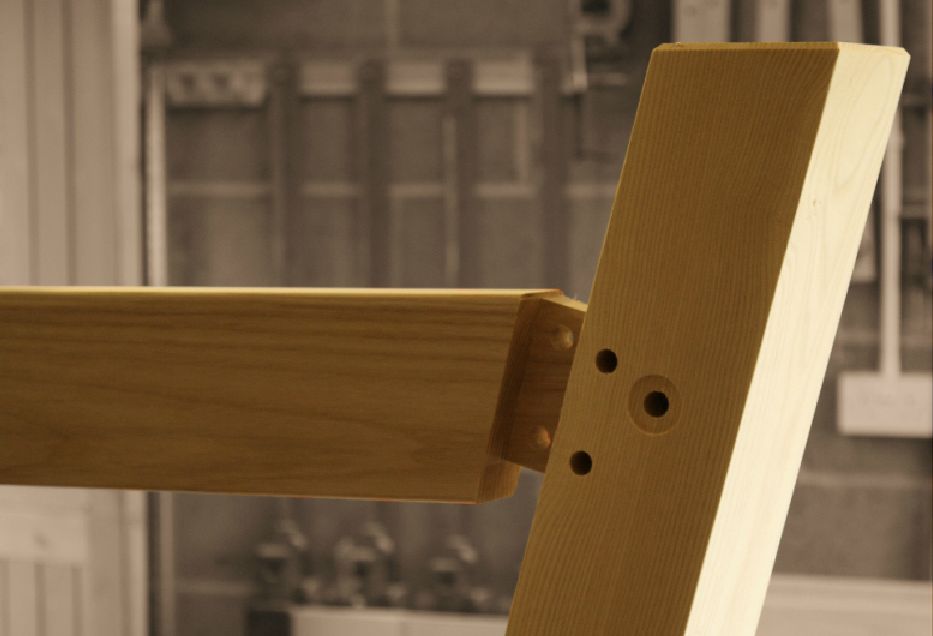
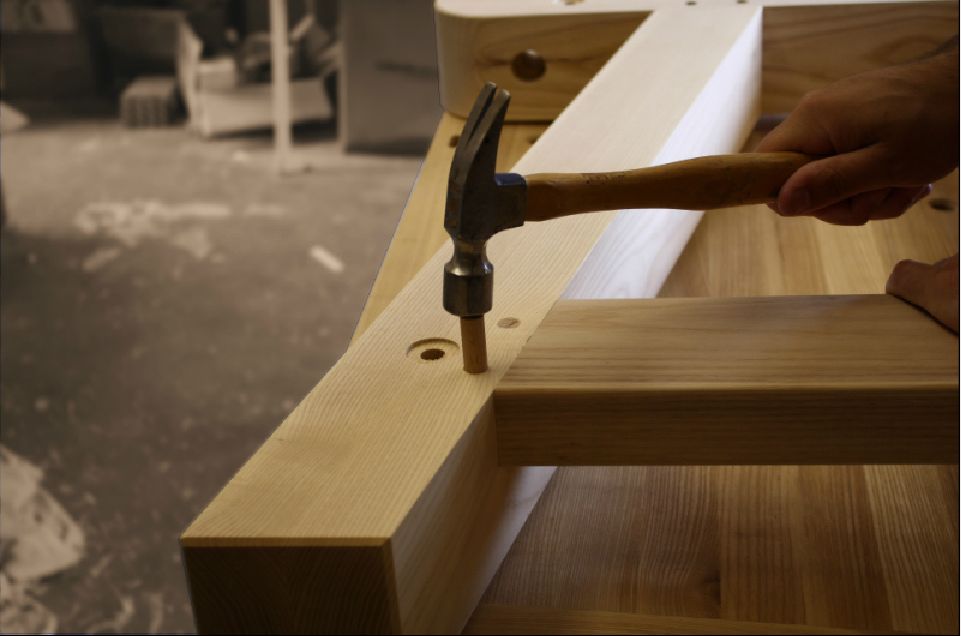
Without going in to too much detail (that’s another post) draw boring adds an extra step to simply knocking a peg straight through a mortice and tenon joint. The important part is in positioning the holes off-set, with the hole through the tenon being slightly closer to the shoulder than the hole through the mortice. When the peg is hammered through it has to bend it’s way in to the holes which pulls the joint up extremely tight and holds it there.
I always love to see a mechanical nature to a joint rather than relying soley on glue so I’m a fan of draw boring. And though glue might be able to hold joints tightly for us these days there’s one particular advantage of this method which I find still makes it far better for certain circumstances.
Today I’ve been assembling trestles for the Little John workbenches. Without the use of draw boring my day would have given me one hell of a headache. First there’s the splayed back leg to deal with and then there’s the large quantity which I’ve had to bring together.
Using glue alone in the joints would mean the use of clamps. Drawing boring is a fantastic alternative and the beauty is you can ditch the clamps altogether. The pegs pull the joint up tight and hold it in place while the glue drys. That’s a lot less faff and a lot less space than having to use clamps and I’m especially grateful when doing this mass of angled legs.
Mastering traditional techniques isn’t all about recreating every process for the sake of doing it the ‘old way’. For me it’s about taking out the relevant elements which can be used to benefit the efficiency in your workshop today.
![Which Saws Are Best For Ripping Thick Stuff? [Video]](https://www.theenglishwoodworker.com/wp-content/uploads/2022/12/what-hand-saw-is-best-for-thick-rip-cuts.jpg)
![How do I Sharpen a Router Plane? [Q & A Video]](https://www.theenglishwoodworker.com/wp-content/uploads/2022/11/how-to-sharpen-a-router-plane-video.jpg)
![Bench Top Edge Jointing [with Video]](https://www.theenglishwoodworker.com/wp-content/uploads/2022/10/bench-top-edge-jointing-video.jpg)

Hi Richard, nice topic. I use draw boring with all my mortice and tenons, all the joints on my workbench were draw bored. One thing all glues have in common, one day they will brake down. Not in my life time, but one day it will fail.
Draw boring will keep the joint together long after the glue has failed.
Great post buddy, good job. 😉
Cheers Ken, it’s kind of a second nature habit for me to draw bore all mortice and tenons also. I always have a hard time trusting anything I can’t understand, glue being one of them!
I used to eschew “fuss”, but now you have convinced me to avoid “faff” as well. 😉
Seriously, do you find it necessary to use a drawbore pin to pull the joint together and ease the hole before driving the dowel, or is a taper on the tip of the dowel as much as anyone needs?
Thanks!
Hi Scott, that’s a nice point to bring up. I draw bore nearly every day and I do have a set of draw pins (somewhere) but never use them. For me, as you suggest, it’s the taper on the peg and a well prepared peg in general that does the job. I do however tend to put a full length taper on mine.
Draw boring would make an excellent future video when you have time, Richard. It’s an excellent technique and I’d be very interested to see how you do it.
Thanks Paul, that sounds like a good idea… We’ll try and get it squeezed in sooner rather than later.
Other advantages;
You don’t actually need any glue. There are many instances of drawbored joints that have survived hundreds of years and they had no glue from the start.
Your mortice and tenon don’t have to be particularly accurate. Even a sloppy fitting tenon can be made completely secure by using drawboring. As long as the shoulder is sharp, you’ll see a good mortice and tenon after assembly. So they can be a good rescue method when your mortice and tenoning goes awry.
Hi Alex, another cracking point to bring up. I always like the idea of glue less woodwork. When you think about it it’s easy to see where this kind of joinery stems from and of course glue didn’t always come of the shelf so joints that held themselves would be far more practical… and getting away with a rough fitting joint’s always a bonus.
I agree with Alex…….Without glue the joint could last forever.enjoy your blogs!!
Cheers Robert, mechanical over glue every time!
OK Richard, read all posted so now I need one item cleared up for me, & I have one question:
In your answer to ScottV you say that your pegs include a full length taper, doesn’t this then reduce the pull on the tenon by the peg? Should not only the tip of the peg be tapered?
Do you ever have a concern with the peg blowing out the end of the tenon? or splitting along the grain? What is a proper amount of tenon length beyond the hole?
PS: Great blog, glad I came across your site.
Thanks Tom, to fully explain the full length taper I should have mentioned that I start out making my pegs oversized. I will share a full explanation on this some time but basically I’m looking for the peg to be slightly oversized at one end and slightly undersized at the other – the taper is very slight. This allows the peg to find its way easily and will pull up tighter as it’s hammered in, leaving a nice tight fit in the hole at the surface.
I’ve never found the peg to blow out the end of the tenon – I would expect the peg to break first if something were to go wrong.
For the tenon length beyond the hole it’s going to depend on the circumstance and how much strength the joint needs to have. As a general rule more length is always going to be better and if the tenon is short then you’re best to reduce the peg diameter. I’ve used drawboring successfully on some very short tenons such as those along a breadboard end.
Richard,
How much of an offset in the holes do you suggest?
Hi Glynne, the amount of offset really depends upon the situation and will scale to the joint. Somewhere between a 1/16″ and an 1/8″ normally does it .
Have a look at this blog about Tom B last question :
http://thecarpentryway.blogspot.be/2009/10/bracing-situation-iii-tension-design.html
In the paragraph above the last picture, Chris Hall recommends 7X the peg diameter.
Richard, did you cut the tenon in oblique to solve an assembly problem?
Sylvain
Thanks Sylvain, the back leg on the trestle is splayed so to create the joint I could either cut the tenon like this or cut in to the mortice at an angle. I opted to angle the tenon as I felt it could be much easier keeping the mortices square.
Richard I like the statement you make at the end of this blog entry about mastering traditional techniques. That would make a really nice quote to put above my workbench.
I have to admit though, learning traditional woodworking for me is also quite a lot about applying age-old systematic instruction for the purpose of learning a new discipline, with hopes that if I diligently apply myself I will have the end rewards of pride and accomplishment.
Mike
Pride and accomplishment; that’s definitely what hand tools bring.
Good thing about draw boring benches without glue is easy to drill out pegs if you have to disassemble to move it, especially if its a big one.
Enjoying the videos very much, thanks Richard
Rod
Cheers Rod, that’s something I recently had to do when I assembled a load of legs the wrong way around… I had to do it against the clock though because I used glue and it was setting fast!
One last point. As Peter Follansbee showed on an episode of The Woodwright’s Shop, the pegs don’t have to be round. He just whittled down square pegs and banged them in. The result was a little more rustic, but still attractive and of course completely serviceable.
Thanks, great point. Though they’re functional pegs can also be a great way to add character to your work and some nice rustic ones can be a plus on the right piece. The method I use to make pegs means the surfaces are made up of a series of flats rather than being completely smooth and this actually helps keep them locked in.
Dont forget, if you use drawbored joints with no glue, you can dismantle them for repair of a component or for removal or whatever.
I made a hefty bench out of redwood 4×4’s 8×2’s and 6×4’s. I used oak pegs tapered very gradually (probaly about 1 in 24) I think of them as round wedges. I know a lot of folk use a cylinderical dowel with a “pencil sharpened” end, but I always think the joint gets pulled up too suddenly using that, not gradually as with a tapered peg. In fact if the tenon is going to fail, the cylinder type peg is more likely to bust it. Anyway, that bench was solid, you could of serviced tractors on it. It had 4 massive braces like you get on a barn. Even with unglued joints, it never racked, squeaked, warped or anything, always stayed flat and square
Some great points there Jonathan, much appreciated. I think you’re cock on there about you pegs, these days a tapered peg and a pointed peg can get quite confused. It sounds like a lovely bench!
Indeed it was Richard! It had an immense beech post vice and 2 huge hand forged holdfasts, worked a treat…Unfortunately a house move forced a very reluctant sale. Then I moved to another town and lo and behold in the garage, unbelievably, they had left a 10 foot bench (not unlike Mr Sellers’s bench) with a record quick release vice. It is probaly 40 or 50 years ago, the top and apron is 10×2 pitch pine…