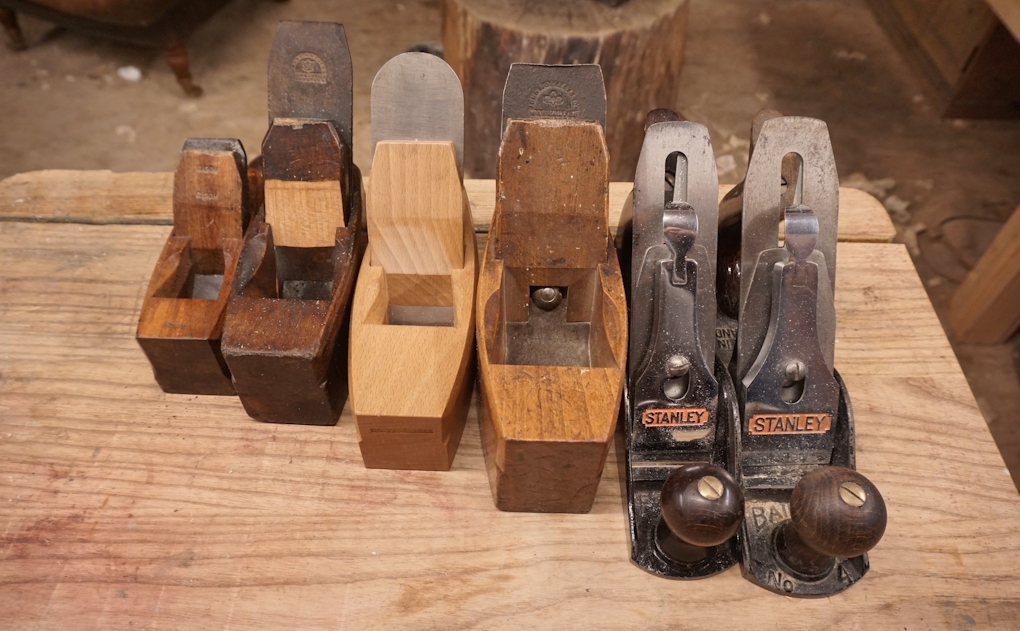
A selection of smoothing planes, from the tiny wooden coffin smoother, up to the Stanley No 3 & No 4 bench planes
Small Planes Are The Best For Smoothing
When writing these articles I hope to provide an insight in to my ways of working. This is never to dictate, and if you read it as though what I do is the right, or the only way to go about things then you could end up confused. But through reading various opinions on the same subject with an open mind, you can take away something very valuable each time.
The basics of woodworking are very simple, don’t let anybody make out otherwise.
But it’s also a craft, an art, a means for self expression.
In our individual workshops we take the basics and often without realising, we come up with our own tweaks and quirks until we have our own unique set of rules, and to me this is the most fascinating aspect of it all.
My Preference For Small Smoothers –
When writing about smoothing planes previously, I made the point that if I was picking a dedicated tool for smoothing, then I’d always prefer a nice short one. In metal plane terms this would be the on a No. 3 or equivalent.
I’m not saying that the No. 3 is best, full stop, go and buy yourself one. I’m saying that I favour a smaller smoothing plane and here’s why. I know that I find it interesting to understand people’s choices so I’m going to write a little more about my thoughts on this.
Holding The Smaller Plane –
When I mentioned strangling your plane, this was because I can’t fit my hands in to the handle of most small metal ones.
I’m not squeezing around the neck by the way, just pinning him up against the wall.
Or perhaps it’s clearer to say that I’m grabbing the metal plane as though it were a wooden smoother.
Along with the smaller size, I want a smoother that can be comfortable, I need a good grip and feedback.
Overall, I’m a massive lover of wooden smoothers rather than metal for this reason (and many others but I’ll wine on about them another time ).
I find that the design of any standard metal plane, smaller than a number 5 is a struggle to hold, at least by the book. And the No. 4 is the most uncomfortable of them all.
The narrower body of the No. 3 at least allows me to pull off my straggling grip tactic quite well.
While none of the smaller standard metal planes seem to be designed for working hands, some of the snazzy infills are. If you have the cash to splash and are looking for the ultimate metal smoother, then that’s where I would start. (Note for Helen… this is the one I’ve had my eye on!)
Dedicated Plane For An Exceptional Job –
It’s important to note that the No.3 is probably not as versatile a size as the No. 4.
I’m recommending it as a dedicated smoother rather than an all-rounder.
I’ve already explained that I’d use my smoother as a companion to my Jack plane, and in my day to day making, I also have a try plane, not much longer than the jack but set relatively fine.
I reserve the smoother for when it really counts; I rarely work an entire panel with it, I find that pointless since I’ve already planed it once.
90% of the time the try plane leaves the finish that you touch on my work.
Only when a piece is being a sod do I get the smoother out; the assassin for small targeted jobs. A small size is ideal for this since it is less disruptive, more controlled and with experience you will read the timber ahead of time and come in at a particular direction and / or skewing the plane to deal with any localised challenges.
Also, the smaller plane is easier to perfect.
If you don’t work like this you may find benefit to a larger, wider smoothing plane, the 4 1/2 for example.
I’ve been asked why I don’t use a block plane for smoothing. If you are thinking about this, then we’re on the same page. I just don’t find the body shape to be optimised for this job. If it’s comfortable in your hand then go for it, but don’t forget the lack of a cap iron.

The No.3 is a dinky plane.
Is it really? I have a nice big coffin smoother which looks pretty huge alongside my group of standard sized coffins. If I put the large one up against the No. 3 it seems to shrink.
It’s my standard wooden smoothers which are dinky by comparison, so maybe smoothers have always been small. Just one of the many reasons that it’s my wooden planes that I prefer.
Learn More About Choosing And Using Hand Planes:
– Create An Exceptional Smooth Surface By Setting Your Cap Irons To Control Tear Out
– Forget Dedicated Smoothers, If You’re Starting With One Hand Plane, Make Sure It’s This One
![Which Saws Are Best For Ripping Thick Stuff? [Video]](https://www.theenglishwoodworker.com/wp-content/uploads/2022/12/what-hand-saw-is-best-for-thick-rip-cuts.jpg)
![How do I Sharpen a Router Plane? [Q & A Video]](https://www.theenglishwoodworker.com/wp-content/uploads/2022/11/how-to-sharpen-a-router-plane-video.jpg)
![Bench Top Edge Jointing [with Video]](https://www.theenglishwoodworker.com/wp-content/uploads/2022/10/bench-top-edge-jointing-video.jpg)

Very interesting. I’m still trying to find my balance. It is difficult to balance all the seemingly contradictory expert opinions when you are a new hand tool user. For instance, I use my no 4 for a LOT of different things, but that means for proper smoothing I always need to sharpen it more since I have used it for gross material removal. My own minimalist philosophies marry well with yours I think, so it will be interesting to see your approach to sharpening should you ever feel like sharing that with us.
Hi Justin,
Yep I will do sharpening soon, I’ve just got to pluck up the courage! Minimalist woodworking really is a pleasing way to go with handwork, even if it’s just while you get to grips with the basics. It sounds like you’ve really taken to the No. 4 so don’t change your approach there, what you might like to try is having a second iron (can be had for a few quid) and have this set up just for your smoothing; create an absolute gnat’s nadger of a camber and make sure the cap iron’s seated tightly and is butted as close to the cutting edge as you can get it. Having the cap iron like this will allow you to keep the mouth open on your plane for the roughing work.
Thanks for the tip! Not sure what a gnat’s nadger is but I bet it compares favorably to a mosquito’s mustache– our local unit of miniscule measure.
Yea, that sound like a good comparison. A gnat’s reproductive area 😉
My process is the same. My “Jack” (try plane sized) plane leaves the finish on most work. I made a wooden smoother with a 55 degree bed for the wood that just refuses to behave. It’s a pain to use because of the high angle, but when I need it, I’m not thinking about the running start I need to get it going, It’s because all other planes have let me down.
I think the “smoother” has become “the Number 4”. Meaning people don’t really have dedicated fine smoothing planes. It’s more of a “this is a good size for almost everything, let me buy a few”. I’ve seen as many No.4’s with an extreme radius on the iron being used as a scrub as a No.4 with the frog all the way forward and the cap iron finely tuned.
Hi Joe,
I like your attitude of just knocking up a plane that you needed!
You’ve hit the nail of the head with your smoother there, it doesn’t matter if it’s harder to push if you’re not planing the whole piece, therefore you can optimise it for this task alone.
An excellent piece of writing, one thing that is difficult for the skilled man/woman to come to terms with, is the fact that the skills which they have are simple, I have spoken to so many people that are carrying out highly skilled specialist work ,that will tell onlookers that anyone can do it, having been in the position of teaching (or trying too) students in the skills of machining metal I have found that a job which one person finds easy, is equivalent to rocket science to another, I have no idea quite why, it must be something to do with confidence I suppose, as it is only with confidence that “skills” become an everyday thing, that is why it is much easier to impart knowledge by encouragement rather than fear, just think back to your school days, you learn much more from an encouraging teacher than an ogre. I think we also learn by examples set by our teacher, that is why sites like yours are so good, you give people encouragement to try a different method, methods that a teacher may put down as “not the way to do it”. just keep the knowledge coming, many thanks for posting these “lectures”.
Hi Chris,
I did particularly poorly at school myself but something I did pick up was that you can’t always teach by telling how to do something, for a lot of people it’s more important to understand why. Confidence is king, you’re absolutely right there.
Thanks for the very kind comment, I do sometimes push the publish button and then wander if it even makes sense!
Interesting thoughts Richard, and your line of argument seems reasonable to me. Your comments are about holding a metal no. 3 like a wooden plane are particularly interesting to me as I have large hands as well. You have me considering replacing the tote on my no. 3 with a block that would sort of emulate the shape of the rear of a wooden plane as an experiment. Have you given any thought to this? Or tried it? I’m not sure how to do that without limiting access to the adjuster but I need to explore this a bit.
Great thoughts. Love your blog!
Thanks Eric,
I have considered this to great lengths, but unfortunately that’s all it’s ever stayed as so I’m really pleased that you’ve mentioned it. I see it only being an advantage particularly on a 2 or 3. You may have given me the kick to give it a go, but if you beat me to it do let me know how you get on.
Cheers.
Richard please stop apologising, your opinion is respected….you only have to read your reviews.
I particularly enjoy your video’s……although I have to say the wall behind looks a bit bare…could
almost see it used for a…….
Carry on the good work
Thanks John,
I appreciate the encouragement. That wall cupboard will be appearing one day soon…!
I’m with you on the wooden planes, Richard. But there’s a problem:
Most hand tool woodworkers these days are part-timers, leisure-timers or struggling small shop folk. Time is short, budgets are short. And the wooden planes available are just crap or they are far too dear. When I see “Krenov style” woodies at prices double that of Lie Nielsen or Veritas metal planes, my first thought is that I should leave planes as art to art collectors. I’m not spending that kind of money on a shop tool. And traditional forms – when they are available at the end of a waiting list – are more art at even more extragavant prices. If you want an infill piece of art, it’s your choice (or maybe Helen’s, but for me it’s no choice at all. And Chinese vendors who farm out production to cheap labor in Bangladesh are useless in most instances. Over here in the US, picking up good users amongst the old-timers on e-Bay and such is hard. We just don’t have the old stock to support the rehab market that you have in Britain, particularly in England.
So I make my own. A smoother, a jack, a scrub so far. Looking for suitable stock for a fore plane/joiner plane next. Got blades from Ron Hock, plans for Krenov style construction are all over the Interwebs via “Google University” and other common sources. My old metal planes are gathering dust and I’m thinking of putting them on e-Bay. These things are a joy to use and they look quite decent. It ain’t rocket science, it doesn’t take long and with careful work, they are easier to use than and just as fine as a Stanley, a Lie Nielsen, a Veritas, a Clifton, etc.
Maybe I should go into the business.
“Maybe I should go into the business.”
More people making tools is better than fewer. It seems like wooden plane makers are dying out or retiring faster than we can replace them. God bless the Bickfords of the world keeping the fire burning.
Polly,
Your post is close to 3 years old and I am curious to know what you have done with wood plane and whether you are still making your own.
Another great post Richard. I too settled on wooden smoothers for preference for general work but for difficult grains my Veritas #4 bevel up with a York pitch blade (50 degrees) cannot be beat. I struggled for a long while before finding this solution. I don’t know if this would work on a Bailey pattern bevel down plane (York pitch that is). I should point out here in Canada Veritas tools are almost half the price compared to UK.
I know this is an old post, but I feel the need to weigh in here. I don’t have overly large hands for the average man, and as a matter of fact my wife’s hands really aren’t that much smaller than mine. That being said, who on earth did they make No. 3 planes for ….. children?!? I have been looking for a nice, older wooden smoothing plane, preferably a nice coffin shape for many years now – they made them in the millions, but getting a decent old one is a real problem! I cannot help but wonder what Shrek does trying to use one of these smaller planes, and block planes have a different blade angle so that really doesn’t work as well either. Good luck, thanks for posting this and keep up the good work.