I’ve said it many times (though I’m sure I’m on the wrong page).
I believe that hand tools are the most efficient set up for the individual maker.
And not just the hobbiest.
If you’re building one-off pieces for clients then hand tools are still where it’s at.
Most that would disagree lack a thorough knowledge of using hand tools.
I have various reasons, and many exceptions. But I won’t go in to all of them here.
I just wanted to consider one area of working by hand that can lead to terribly inefficient work. And that’s marking out.
Marking out by hand is a very different animal to taking a machine or power tool approach.
This is why I differentiate the two.
It’s not snobbery, it’s that if I set out to do something on machine I take a different approach to starting out by hand.
My machine approach assumes pieces are square, flat and regular. Measurements are fixed numbers.
The hand approach doesn’t care for numbers. Once things are to rough dimension I’ll rarely care to know a length or angle specifically.
Like I’ve said, woodworking with hand tools is the most efficient approach for one off stuff.
But I’m not going to pretend I don’t dread the monotony of marking things out.
In one piece there’s still going to be several of the same joint.
If your table has four legs, then that’s at least eight mortice and tenons.
And I won’t even count the joints when I’m starting a chest of drawers.
I really don’t want to have to mark everything out individually.
Having a poor approach to marking out has a similar effect to a lack of sharpening routine.
It halts your momentum.
Hours spent laying out some lines on wood does not feel productive or motivating. And with poor marking routine everything else that follows will grind to a crawl.
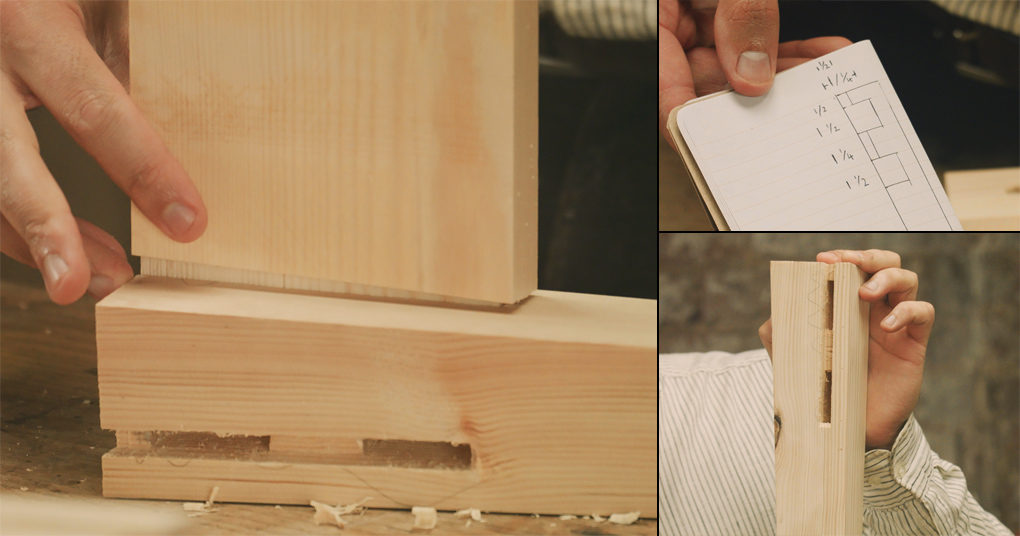
A basic marking rod
Time To Make A Marking Rod
This is why I’ll often spend time in a project to create some kind of marking guide, or rod.
Rods are as simple as they get.
A bit of stick with some key measurements laid out that you can transfer onto multiple parts. But a simple marking rod can be a huge time saver.
And once you gather how they work, you can think up custom solutions for most projects, that not only see you flying through the marking out, but ensure accuracy.
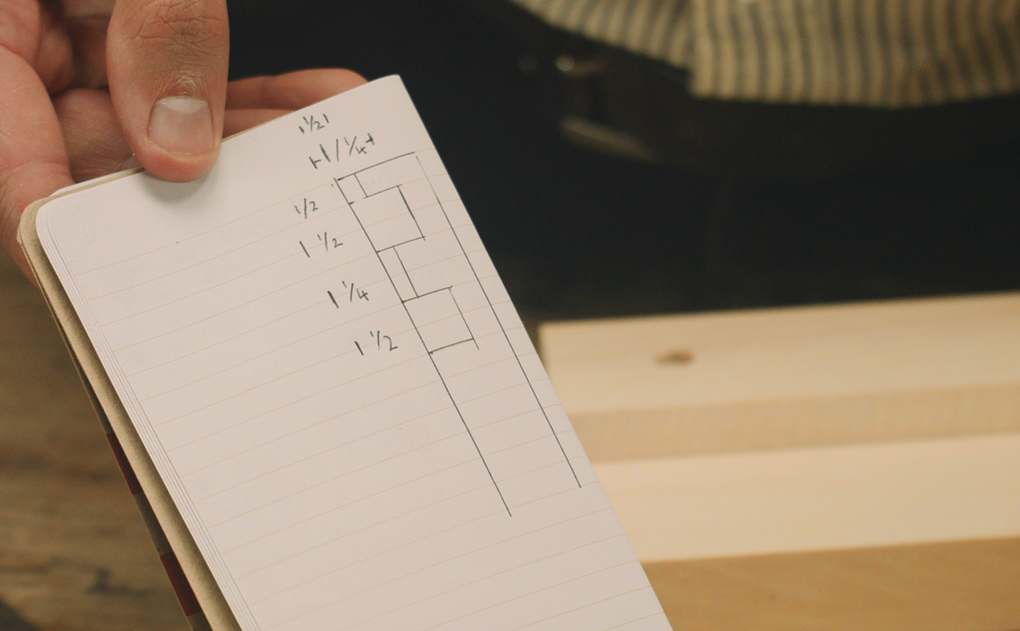
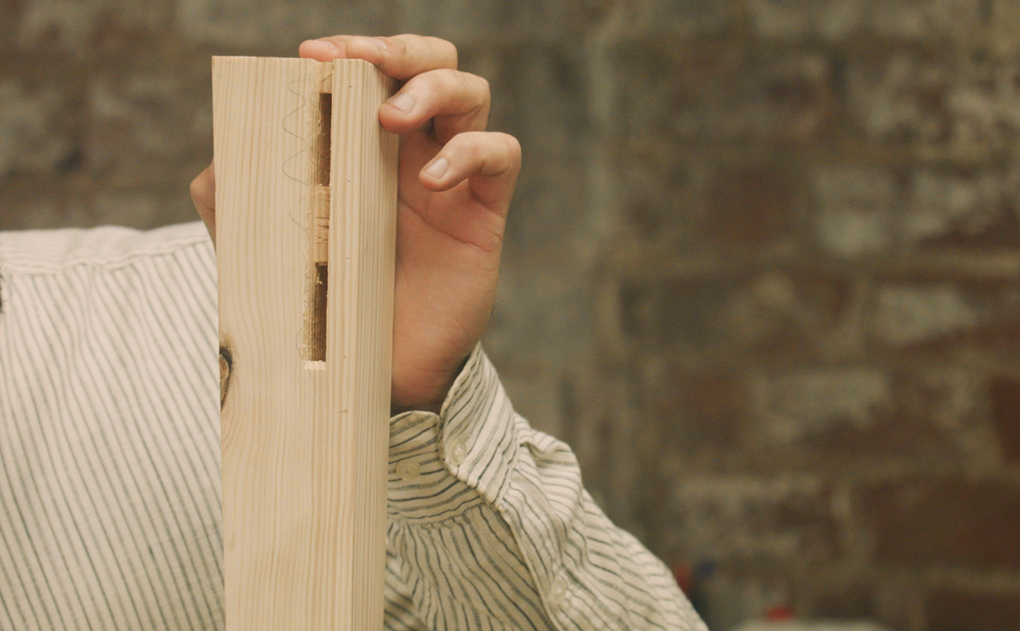
Double mortice & tenon – joint layout with haunch
The Mortice & Tenon Example
Let’s go back to those four table legs that need eight mortices.
They’re double tenons (that’s perfectly normal).
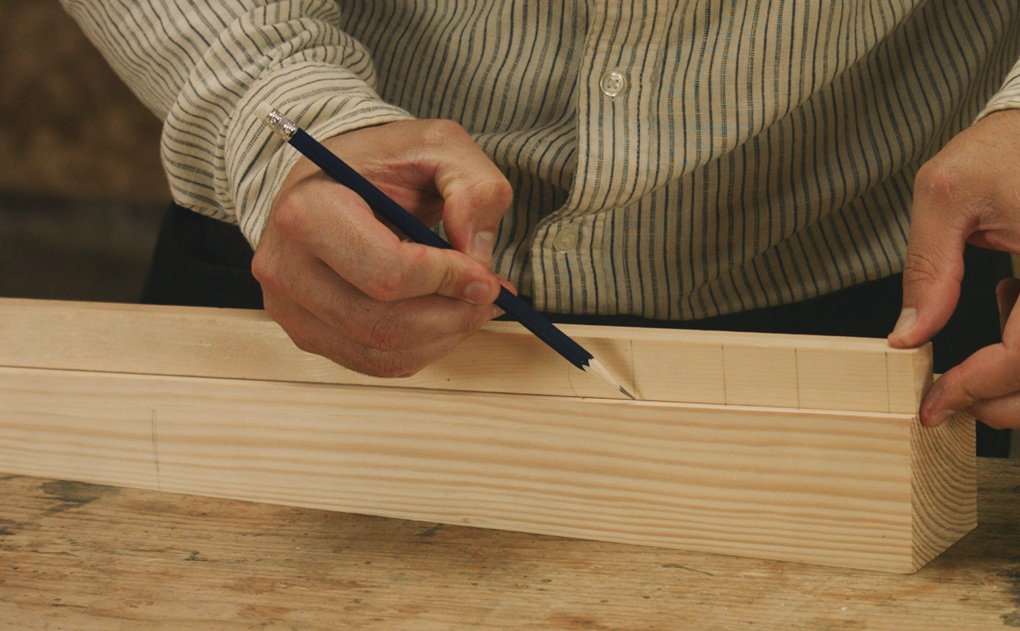
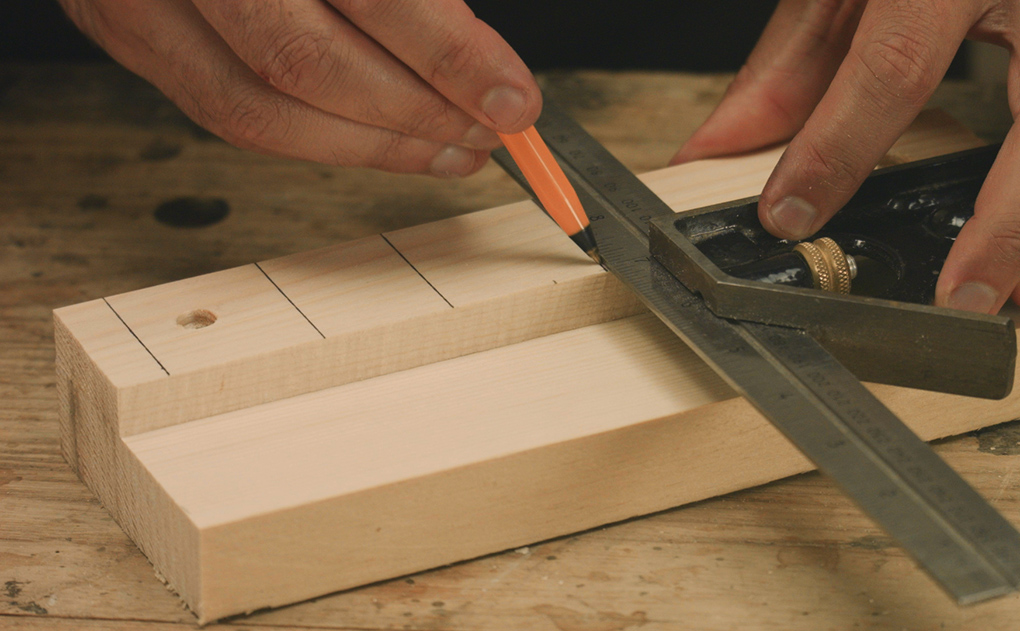
Let’s mark them out with a ruler.
You have to mark the haunch, the first mortice the bit that divides the mortices and then the second mortice.
Now you need to mark the haunch depth, know the mortice depth, and gauge the positioning and width on the leg.
Then do it seven more times…
How accurate do you think you’re being with that ruler?
With the marking all done, let’s chop them.
Every inaccuracy from the marking out is now transferred into the piece.
But I suppose since we’re working by hand we’ll fit each of the tenons individually anyway…
You can quickly see how time starts to stack up, and why hand tools are deemed slow.
Inaccuracies and variation in your first marks mean that extra time needs to be spent at every job that follows. To get things to fit individually.
Making the fenced marking guide.
Evolve The Basic marking Rod
Now let’s get our head out of our arse.
We spend five minutes and knock up a ‘Morticing Marking Rod & Guide’ all-in-one special. (Or fenced marking guide, whichever you find most catchy).
This is what I used in our Hall Table project.
The approach for making one varies depending on the size of joint it’s for. This was quite a long joint so is a bit of a worse case scenario. It still only took a tad longer.
Just like a marking rod, you lay out your measurements for each section of the joint so they can be transferred quickly and consistently to each leg.
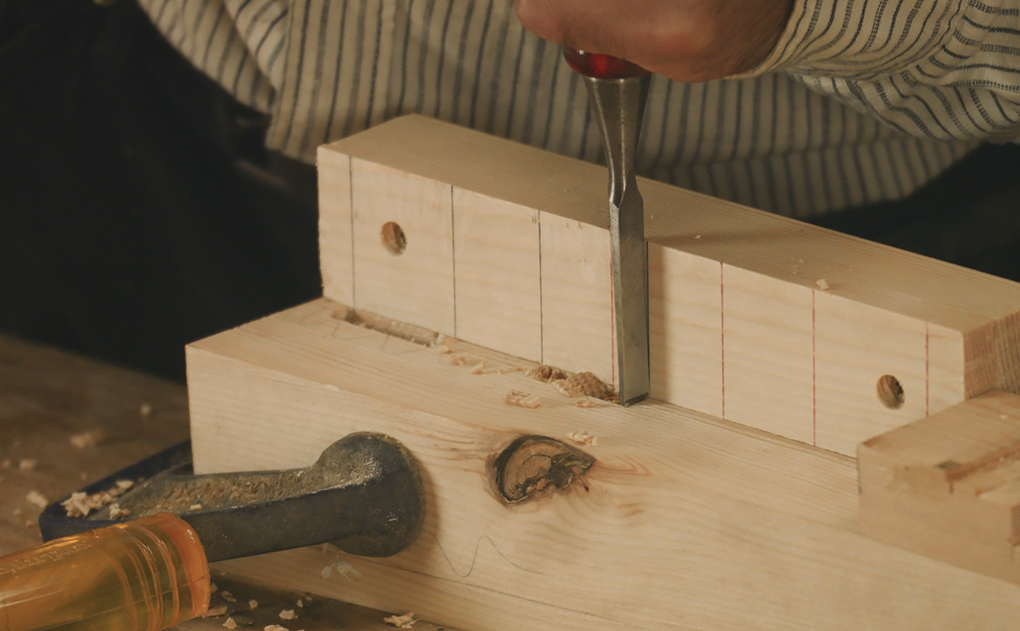
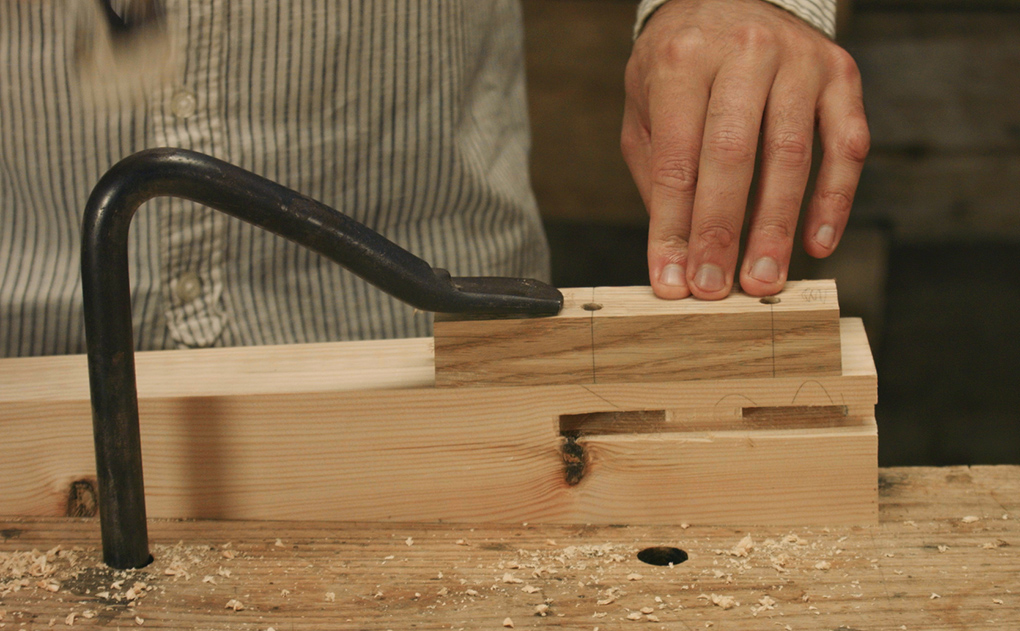
Using the fenced guide to quickly locate, and accurately cut the mortices.
What’s special here though is that this guide has a fence.
The fence is thicknessed precisely so we can locate our chisel against it.
Now we have no marking to do for the lengths or width of the joint.
In addition we can work our chisel along the fence to ensure the joints are dead straight and accurate.
So to top it all off, each joint is almost identical.
This means that our tenons can now all be cut the same with very little fettling.
Mortices are cut accurately and nice and straight.
Efficiency In Prepping
We can get all of this accuracy and speed even on very roughly, inaccurately hand prepped material.
It all works just by understanding face and edge marks.
By referencing everything off pre-determined faces I didn’t even prep the back of the table aprons at all.
They’re still rough sawn, and the legs were well out of square.
Learn more about these efficiencies when cutting mortice and tenons by hand.
Don’t stop there… evolve the marking rod for your needs. This one helps you drill square as you locate your holes.
So Many Possibilities
This is just one example of evolving a marking rod.
I make some kind of hybrid – multi-function thing for most projects.
Later in the table build we’ll have a ‘Mark Fast & Drill Square’ variant for getting us through the drawboring.
You’re probably thinking it’s easier to skip making the guides.
But if you’re building along I urge you to give them a go.
You will save time, I promise.
To really get to grips with building efficiently by hand, I recommend learning to do your woodworking with only one vice.
![Simple Work Holding For Ploughing Grooves [Without a Tail Vice]](https://www.theenglishwoodworker.com/wp-content/uploads/2022/07/workholding-without-tail-vice-copy.jpg)


The best return on time invested is to design jigs so that they can be used on more than one project. I just made one for hand-cutting dovetail splines into mitred corners. It took a while, so I think dovetail splines will need to be a regular feature in my projects!
Thanks for the tip, will try to use that in the near future. It just has to help, so simple.
On the general topic of marking off, I have a stupid question for you – what is that small round tape measure you’re using? I find even the small 3m long stanley tapes are just a bit large and awkward for the small stuff I’d work on on the bench. I’ve been looking about for something a bit handier, but everything seems to be sized for when rough-cutting things in the timber yard rather than working on a bench unless you get those little keyring things which I wouldn’t trust to be accurate enough for anything.
Use a flat measure on the bench. I have several from 6″ to 36″. The only time I use a tape is for measuring lumber or cutting to rough size.
I have a 6″ Mitutoyo and a 24″ no-name along with a 6″ M&W square but a small tape when figuring out rough cuts on a piece that won’t be over 3′ long would just be handy.
Hi Richard and Helen,
Thank you very much for your very informative rants and videos. I value it so much. My question is: Is the marking rod described by you above is the same as a Story Stick?
Cheers
Warren
Warren – I think his concept goes beyond the story stick. He has added a fence to the one used for mortises and it’s tall so that it provides a physical registration for the side to side location of the chisel and the height of it provides vertical guides to help keep your chisel perpendicular. Does that make sense?
Marking rods and story sticks are very general labels for a group of template tools. I’ve seen very elaborate story sticks as well as very simple ones. They can be straight, curved, 2D and 3D.
Warren, What Richard and Helen are doing is quite interesting to me. They are making known to us steps and methods that were used for a long time, but have been almost forgotten over the past 100 years or so. A story stick or board were used in many areas of building. House builders used them for siding, window elevations, etc. Like Richard said, anyplace repetitive measures were needed, speed and accuracy. Frank Klausz shows using one for a whole cabinet project, maybe in his dovetail a drawer video, can’t remember. He was also schooled like Richard from his dad and grandfather, old school. The beauty of Richard and Helen’s videos is they bring back everyday REAL processes that real craftsmen used for who knows how long. And they worked well. Why are people trying to ” new and improved” things that really work? Richard has taken a story board or stick and used it again on a small scale for what, speed and accuracy. Usually the saying goes, “Those that can’t, teach”. Once in a while comes along an oddball that can do both, Richard. Hats off to Richard and Helen for taking the time and interest, thanks guys. Hope that helps Warren.
Matt
I couldn’t agree more Matt.
I have to admit I had one of the best teachers alive in the fifties and sixties. He, like Richard an Helen, was an amazing, time served, but by then, long beyond retirement age Master Craftsman who could teach, even if his method of pulling me into line often meant a mallet smack on the head. With regard to those “RODS” I don’t think I’ve ever made anything without using at least one and on some projects loads.
Hi Matt,
Thanks very much for your detailed explanation. It certainly does shed light onto the subject for me.
Cheers
Warren
I agree completely, Matt. One thing I found early on with story sticks was, after the work is finished, if the sticks might be sufficiently general to use later, take the time to label them, a job and date and a few details to help you remember! I still have a few sticks (and spacers) around that I use often enough. Yes, thanks Richard and Helen.
In my youth, I worked for an old fellow who taught me the importance of story sticks and other marking jigs. Then I worked for a time in traditional wooden boatbuilding, learning lofting. All the lofting and layout tricks I learned had me doing interesting design and planning work in a small custom furniture shop the last years before I retired. I tried to pass on this arcane knowledge, but most young pups had little interest.
I had a slightly different experience with boat building, not the traditional kind as such but still worthy in its own right. The ships Captain I worked for who was also a shipwright demonstrated to me through due process the biggest challenge one could face -the client. She had no idea and quite a bag of cash, you need to for a 93ft solid timber launch. I would have liked the opportunity to have worked with him further but the client had a shelf life which expired before that could occur. I had been accused when I was twenty by a colleague twenty years my senior of growing up awful fast- only in some ways, there is so much to learn. Thanks Richard
Brings to mind the way the Parthenon and other great ancient buildings were planned. As a permanent record scratched into the stone itself so they could not be lost and they could be accurately transferred to the job often over periods of hundreds of years long after the original creator was dead. Thoroughly agree with Richard’s assertion that measuring out 8 tenon and mortices for a job with a rule and square means that without a lot of care you could easily be 5mm or so off from the first to the last with each subsequent error being different. A least with the marking rod any error should there be one will be consistent and therefore quicker to remedy.
Brilliant read once again Richard. I’m in the middle of building a toy box with 14 dovetails on each corner. It would be an arse to mark them out so I’ve made a story stick with knife marks which I clamp to the boards and drop my knife into these marks and mark off. Also I mark pins and tails at the same time and they fit spot on.
I like this idea. One thing tha puzzels me when it comes to joinery is when to use different types of joints. When is a simple mortice and tenon enough? When should it be a double tenon? Should they be parallel or one above the other? What about a haunched tenon?
Thanks Frudd, that sounds like a good subject for a post, we’ll try and cover it at some point.
That would be great.