References: Build A Hall Table Video Series | SIGN UP to watch the Free Hand Plane Build
[Watch the video version above].
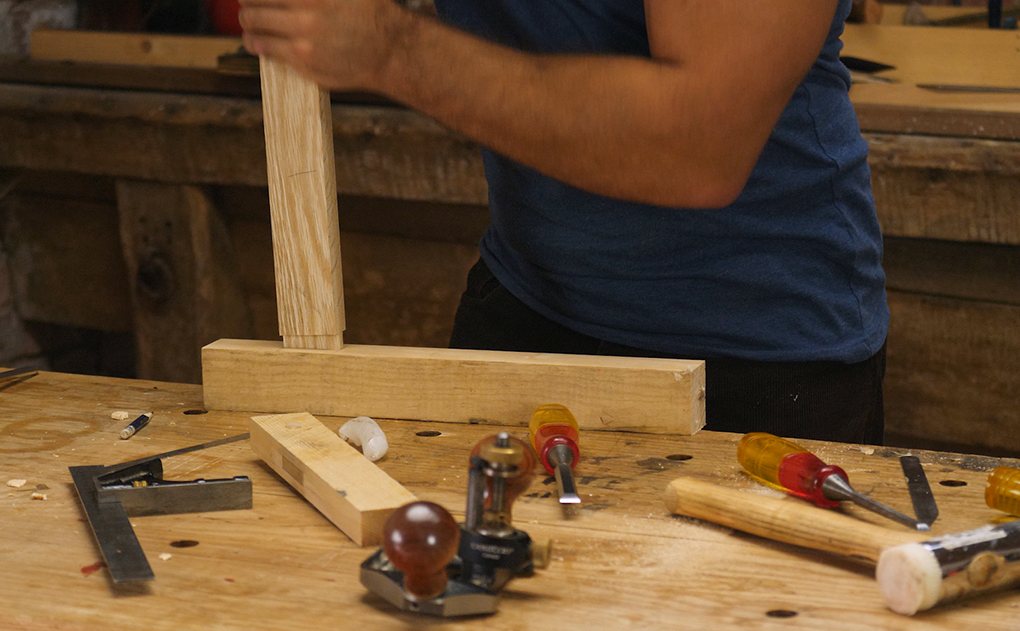
If you’re cutting a mortice and tenon by hand then it’s likely things aren’t going to be perfect at the first fitting.
If I’m building quickly and I can get away with it, then I’ll deliberately make some gaps and ensure that they’re on the face that won’t be seen – this can offer a few advantages.
But if both faces of the joint are on show then I’ll aim for perfectly tight shoulders right the way around. Problem is, when you start to put a critical eye to it, you’re likely to find an unwanted gap.
There can be various reasons for the gap – it could just be some crud that needs scraping out. But one of the most common reasons is because the mortice itself has been chopped a little out of square.
If this is the case then the joint might seem to fit perfectly, but when it sits home you’re left with that unsightly gap down one shoulder, and if the rail’s long enough you might spot it running slightly askew.
The Fix – Fine Tuning Your Mortice And Tenon
There’s a quick and easy solution to this problem.
Don’t touch the tenon.
If the joint sits home then you’ll only make it loose by playing around there.
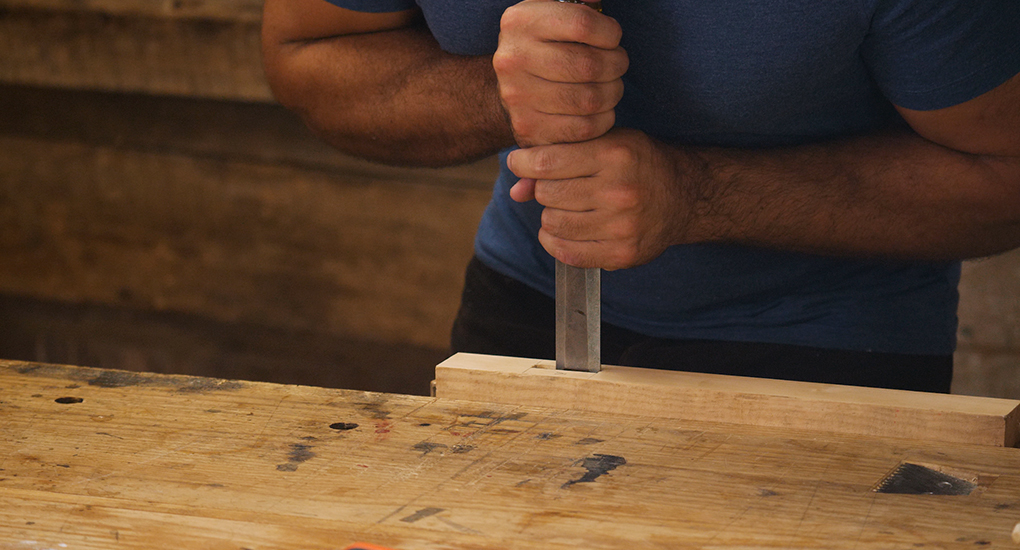
Pare the mortice on the side that’s opposite to the gap.
Instead you want to make a very slight alteration within the mortice. We make the adjustment on the opposite face to where the gap is visible. We’ll pare that wall so it kicks out a little towards the bottom. It’s about changing the angle not the fit, so we’re trying to remove as little material as possible towards the top of the joint.
If we exaggerated things to help visualise them, then we’d see that to begin with the mortice walls are parallel but slightly tilted to one side. Our adjustment will take the walls out of parallel so that the mortice is wider at the bottom. A small adjustment will make a big difference, so the joint will still remain a good fit and be nice and tight at the top.
You’ll want to pare just a little and then check, as that may be enough to put things right.
The alteration will be slight, but if exaggerated you’d see that the mortice has become wider at the bottom than the top.
If you’d like to learn how to cut perfect the mortice and tenon with nice crisp shoulders, then check out our Chair Building Video Series.
Or for a faster approach when those inside shoulders won’t be on show – learn the efficient way to cut a mortice and tenon by hand in our Hall Table Video Series.
![Pt 2: Reamers & Tenon Cutters: Use & Applications [Shop bought vs Homemade]](https://www.theenglishwoodworker.com/wp-content/uploads/2026/06/355735B8-6EB7-48E7-8135-A45EC52D5F2F-400x250.jpeg)
![Pt 1: Understanding Chair Joinery: Tapered Round Joints | [ FREE 6 Part Video Course]](https://www.theenglishwoodworker.com/wp-content/uploads/2026/06/D4FD5406-5390-49FC-B939-255EFF4F845C-400x250.jpeg)
![Why and How to Blunt Your Chisels [VIDEO]](https://www.theenglishwoodworker.com/wp-content/uploads/2026/06/26269099-F519-415D-9196-5BF152B10DFF-400x250.jpeg)
![Remove Saw Set = Improve Your Joinery [Video]](https://www.theenglishwoodworker.com/wp-content/uploads/2026/01/9D16FCB8-2406-4C54-93C9-550C75097009-400x250.jpeg)

What a great explanation to a common issue. It never occurred to me to pare away just the bottom of the mortise. Thanks for the tip!
Also, maybe it’s the shirt, but Richard is looking pretty ripped here! I might have to hit the gym instead of the shop tonight…
Thanks! These videos have all been incredibly helpful to me as an old dog learning new tricks. .
THANK YOU Richard!
Correcting these minor, but inevitable, little problems is one of the things missing on so many other woodworking sites.
As much as those other sites stress fine tolerances, and repeat the mantra “perfect!” they rarely tell us how to fix something that’s gone wrong. It’s almost as if they can’t even talk about the imperfections that we’ll inevitably make.
Thank you for being different and showing how to fix a rather common problem.
Thanks also for Helen’s fine production work. Your videos (and the catchy music) definitely stand out as top notch.
Bloody hell ! Richard what have you been arm curling oak trees 💪👍
Looking good ! I’ll have to dig me dumbbells out now , actually I think a chucked them under me English workbench 😂
That reminds me that vice screw you recommended from dictum tools , it came early what a piece of kit that is absolutely amazing I couldn’t be happier with it a fully recommend it to everyone .
I’ve been using it for a few months now I’m on making a dinning table
It’s me own take on an Ercol planked top table ooh! check me out!
I’ll put some photos on the gallery board thing see what you think and don’t laugh ha,,!
So thanks for the recommendation for vice screw and also this video
Its great info so easy now a know those little adjustments like that make all the difference were when I first started having a go I would of just lost me rag and chucked it and a think that’s what puts people off is when you’ve been using an electric router and jigs , table saws etc you expect it to be right firsts time and it’s not gonna be well not at first, but I tell you what the joy of doing it with a sharp chisel, hammer and radio on far out ways the noise of an electric router ,dust,earmuffs , eye protection and the constant fear of slipping!
Hand tools = sheer bliss !
A just need to pick up the pace I’m hoping that’ll come , well that was a bit of rant cheers
Ste
Arm curling oak trees 😂😂😂
Great information emphasizing doing woodworking with basic tools .
Thank very helpful
It seems to be all the little things from Richard make big differences in my work. Thank you!
Love your work Ricardo! So simple and clear.
Love it, straight down to the nuts and bolts of how to get joints corrected. It makes sense that it would be difficult to cut mortices cock on as you put it when you consider the average distance that the tenoned piece will be away from the mortice. It magnifies the smallest inaccuracies. I found it fascinating the idea of being on the right side of wrong in your hall table series as an intentional decision for not only speed but strength.
Great tip, Richard. Thanks!
Great. Thanks. As one who ‘on occasion’ finds my work wasn’t 100% accurate I appreciate this ‘How to fix that instead of throwing it away and trying again.’
Oh.bbut it is so tempting to pair that nice wide, easy to access tenon, and then WHAAM! The joint is loose.
Helen remember that video you were going to make for us on finishes… Just say’n
Huge thanks for yet an interesting post.
Slightly OT though: I wonder why you sharpen your pencil with a chisel instead of using a knife. Every Swedish carpenter have one in his belt – for rounding butt ends, making pegs, breaking edges, curving straight lines, shaping 3D-objects (whittled handles are excellent – remaining facets increases the grip), cutting small/thin pieces to lenght etc. etc. Whittling against your thumb increases the control and precision more than tenfold and you’ll never risk to break the lead. A knife can substitute tens of other edge tools, is always at hands and does not require fastening of the work piece.
The venerable Paul Sellers even go to the length of trying to whittle a spoon with gauges and chisels instead of just using a knife. Is this some kind of British knife-aversion strategy?
I suspect it’s more to do with the chisel being close at hand. With Paul’s spoon making I wonder if it was to do with a minimalist kit of tools. You don’t have to go buying more gear if you just want to make a couple spoons. Personally I tend to use a pencil sharpener.
😉
Still it is a serious question: it seems like the anglo-saxon carpentry tradition is refraining from the use of knives, while the Swedish carpenter always have the knife at hand and use it for a large variety of tasks where brits and americans use a full set of different tools – rasps, files, chisels, gauges, dowel plates, chamfer planes – you name it. Here, the knife is normally the first tool you buy – long before you get into advanced and specialised tools like chisels.
Is this a correct assumption, or am I drawing too far conclusions from the videos I’ve seen?
Not sure what type of knife you’re referring to. I just have a marking knife which gets used for all manner of things, then a more box cutter style which I rarely reach for.
What knives do you use? Interested to hear about them.
Just an ordinary classic knife you’d normally wear in your belt. https://en.wikipedia.org/wiki/Mora_knife#/media/File:Moramesser.JPG You’d get one for £5.
I rarely leave my house without it.
Good for almost everything – cutting tinder for your fire, willows for your skewers or sticks to hang your coffe pan on, cutting those irritating shoe laces that are too long and get stuck in the bike chain, cutting your bread, your meat, your cheese, spreading the butter, (cleaning your nails) – you need it dozens of times every day, and as it is always at hand it comes natural to use it also when you’re wood working. Essentially it is a plane without fences, so with a little practice you can do many of the things you do with a plane – plus a lot of other things. As it is faster and leaves a silky, smooth surface I always prefer it before rasps, files and sandpaper.
Jonas, If you know of some videos demonstrating how to use that style knife for planing, etc., would you post the links? I hope that’s not offensive to Richard. I’ve not seen those techniques anywhere. I’d go search, but have no hope of searching in Swedish. It’s fine if the video is in Swedish (or anything). Is the basic idea to guide the tool with the bevel, sort of like on a lathe, and push with a hand on the handle and a thumb on the spine?
Dear Ed,
I haven’t seen any films at all on use of knives in woodworking, except for spoon carving – and youtube is flooded in clips on spoon carving…. My guess was that knife use is taken as such an obvious and simple thing that it doesn’t need any instructions.
Of course, I think you should use the tool you personally find comfortable and gives a result you like. But I reacted to the use of a chisel for sharpening a pencil. It looked both awkward and hard to get a good result as you’re slicing away from you with little control. Hard to avoid breaking the point. Why isn’t he using his knife? It would be the natural thing to do, as all carpenters I’ve ever met always have their knife in the belt.
Then I looked round at internet and found to my surprise that there was almost no use of knives anywhere – except for spoon carving and a few Roy Underhill episodes focussing entirely at knife work. But a lot of clips where people used a large variety of tools in rather awkward ways (eg. rasping backwards) where the knife would be my first option. Faster, simpler, safer, and in most cases better finish.
Does anyone has a theory to why?
For your specific question: For planing a big flat surface I regard an ordinary plane to be the proper tool, Only if you are specifically looking for a live surface with facets I’d use a knife for this purpose. (I would then use the rounded part of the edge and scope out very, very shallow “hollows” in a nice pattern over the surface). But woodworking is so much more than flat surfaces. Flat surfaces are rather the essence of power tools, while hand tools offer so many more options. Chamfers (knives excel in stopped chamfers), edges – especially curved ones, 3d-shapes, rounding butt ends, cleaning up the last traces of the lathe, cleaning up a shoulder of a tenon etc etc. Only your skill is the limit. The advantages are: fast, excellent finish, freedom to work in all 3 dimensions, no fastening of the workpiece needed.
Jonas, I recommend reading through this wikipedia article on the Sloyd educational method. The method emphasizes the use of knife in craft work. When this educational system was imported to the UK, the manufacturing culture in large cities didn’t trust the idea of giving knives to children. Chisels were substituted. Whether or not this completely explains the popularity of chisels over knives, it certainly explains part of the preference: https://en.wikipedia.org/wiki/Sloyd
Thanks a lot! Indeed interesting.
Does this mean that the ordinary English boy does not know how to whittle a willow whistle or how to make bow and arrow or a spear from willows? Or how to make a fishing rod for angling? I would personally never regard chisels safer than a knife – so much harder to get control over and so extremely dangerous for any work against your body or your fingers. And every time you’re out in the wood and want to make a fire. Cutting tinder with a chisel? Making a rod for your coffe pan with a chisel?
Again, this does not fully explain why the knife is so non-existing among professional woodworkers. I guess building workers, riggers, electricians etc still uses knives in their daily work. So why not wood workers?
Well, this calls for some missionary work. I just wonder where to start… 🙂
Jonas, I think you do have a point.
British joiners don’t usually carry a slojd knife. I was trained in Scotland and we invariably used a chisel for many of the things you’d use a knife for. It may have something to do with a more remote connection with the woods, even for rural joiners and carpenters in the 20th century. Most trade joiners and cabinet makers in the second part of the 20th century here would work at the bench where a chisel was readily to hand – even in the hand – at the time you wanted to chamfer a tenon or sharpen a pencil. Most of us wouldn’t have experience of ‘green woodworking’. This contrasts with people like Peter Follansbee who studies and practices early American (~British and European) joinery. And I notice he always has a slojd knife on his belt.
In my own case, I’m retired and enjoying extending my woodworking to include woodland management, living in woods, felling, milling, green woodworking as well as the more familiar bench-bound work. So I do agree that a knife on your belt is essential or at least very useful on the green side. Just where the balance between knife and chisel falls when you’re at the bench might be just a matter of what you are used to. Though since you raised these points I’ve niticed that it’s still easier to pick up a chisel at my bench that to dig a knife out from my belt.
Thanks for raising this point.
Dear Duncan,
Thanks for your thoughts – one step closer to solving the mystery. Again, knives are for more than green work. Once you master them you’ll find it replacing more and more tools.
Well, in the end everyone must be saved after his own fashion, But I recommend you all to give the knife a chance. Faster, more controled – i.e. less risk to cut yourself, and most of all – very fun.
Awesome video! I really appreciate the idea that things can and most likely will not be perfect, especially when first learning joinery. It’s comforting for a beginner to know that if something isn’t spot on, there are ways to fix it. Keep up the great work!
Absolutely brilliant. Thank you. You’d think that after 25 years of Woodworking I’d know how to fix a mortise properly but your method beats all. I am signing up for your classes now for sure. Thank you.
Excellent video! I feel so cool after reading this. You are just a blessing to me and so happy to find your blog..
Keep on the good work
Put a fixed blade knife in your belt. Go down to the local shop.
Get arrested
Share underpants for 6 months 😁