[youtube https://www.youtube.com/watch?v=S7lnfW4iT6o]
Extras:
Improve The Grip Of Your Holdfasts for better work holding
In this quick video I demonstrate my method for increasing the holding power of a smooth shafted holdfast. It’s a simple process which gives a coarse texture to the front and back face of the shaft.
I simply use a centre punch to create this by hammering away to create small indentations on the surface. Don’t be concerned about being overly consistent or even, but remember this is only required on the front and back faces.
And that’s it… done!
Holdfast Manufacture
For a long time the traditional holdfast became somewhat overlooked as an aid to the woodworker but in recent years it’s popularity has started to return. These simple tools are incredibly versatile and I’d go as far to say that a workbench isn’t complete without one.
Traditionally holdfasts were fully hand forged and whilst there would have been no fixed shaft diameter, the hammering process allowed the blacksmith to give a taper to it. This tapering teamed with the rough hammered effect enabled the holdfast to get a firm lock within the holes no matter what the top thickness.
There are many variants of holdfast produced today and it is still possible to commission a hand forged replica from a skilled blacksmith although this is certainly not going to be cheap! The closest alternative to this are the traditional style holdfasts which are machine bent or hand forged starting out with smooth round bar stock. These are the type of holdfast which I use and I have several versions including some that I’ve forged myself. The bar stock ensures a fixed diameter on each shaft which is perfect for our standardised world, but this smooth and consistent shaft can struggle to get a grip in particularly thick workbench tops. With any top thickness approaching 4″ you can start to get a significant reduction in grip. The premium holdfasts such as the Auriou do have this in mind and come ready ‘roughed up’ with a coarse shot blasting.
Au revoir…?
![Which Saws Are Best For Ripping Thick Stuff? [Video]](https://www.theenglishwoodworker.com/wp-content/uploads/2022/12/what-hand-saw-is-best-for-thick-rip-cuts.jpg)
![How do I Sharpen a Router Plane? [Q & A Video]](https://www.theenglishwoodworker.com/wp-content/uploads/2022/11/how-to-sharpen-a-router-plane-video.jpg)
![Bench Top Edge Jointing [with Video]](https://www.theenglishwoodworker.com/wp-content/uploads/2022/10/bench-top-edge-jointing-video.jpg)

Hello Richard,
“au revoir” ??? I just cracked…so funny to see that expression on your face..
On a more serious note; very clever tip! For me this is one of those ” why didn’t I think of it” moments.. And very instructive on holdfasts.
I think your “film studio” looks just nice and reflects the atmosphere of a genuine every day used workshop rather then a staged square filled up with old stuff. Well done!
All the best,
Cheers,
Mac
Hi Mac, I’m not sure where the French came from… I have to put it down to nerves!
Thanks for your lovely comments, really pleased you liked it . I’ve commandeered the space now for all my furniture building so we didn’t have to put much thought in to filling the ‘studio’ I just plonked all the tools where they sat best for working, it’s now very much a ‘workshop’.
Nice post and great video. Great content and video quality.
As a guy who does sound engineering jobs on the side, your mic audio is an area where I would want improvement. The room that you are filming in (very nice by the way) is echoing like crazy. Try to get the mic closer to the person talking or even on them (a clip on lavalier mic for instance). There are many different options out there hardwired and wireless. If you don’t go that route, then please use some material that is highly sound absorptive.
Then there’s lighting. Top down light is fine but 2 point light sources would be great. There are lots of woodworking bloggers out there that do some really nice videos. The first that come to mind is http://www.renaissancewoodworker.com/
Thanks for jumping in the video blogging world! you’re definitely in my subscription list.
Thanks Adam, some really interesting pointers . There are certainly improvements that we would love to make in this regard and in complete honesty what you are seeing here is the result of a pretty challenging set of equipment. We allowed ourselves a tiny shoe string of a budget to begin (two second hand Handycams for £200 off Ebay!) whilst this would inevitably leave some aspects unpolished we always feel it’s the best way to test our own ability as a whole, and being two complete novices in this area it’s the fastest way for us to learn.
Once we settle in we’ll be making alterations as we go.
Again, thanks for your support.
Thanks for the video Richard. Great tip. I’ve currently used sandpaper around the shaft (not up and down) to good results as well. I’m sure it’s nowhere near as effective, but quite easy.
Is there any concern that over time the holes will become damaged by the very rough “rasp like” surface?
Regards,
Michael
Hi Michael, sand paper’s great for this too and is just what I’ve done at times as well. A quick roughen up now and then can do a great job although the sanded surfaces do burnish themselves smooth again with use. This way extra texturing just ensures that the result lasts and I’ve found it much more effective when it comes to those really thick tops. The surface isn’t made sharp at all like a rasp so isn’t particularly abrasive and the holes don’t become worn. Even after several years of using holdfasts like this on the same workbench I can still find that the holes need re-drilling to loosen them due to slight swelling at certain times of the year.
Tres bon!
Great video and an excellent tip.
Many thanks Rob.
After I posted your video to the Oldtools list, some have raised concerns about excessive wear to dog holes. What are your thoughts? Merci.
http://swingleydev.com/archive/
Hi Steve, Many thanks for sharing our video. This concern has been touched on above in my answer to Michael but there are probably a couple of extra points worth making here.
As you’ll know in order to be able to lock down a holdfast has to be able to twist within the hole. The amount that a holdfast is able to twist is determined by both the diameter and thickness of the hole it’s inserted in to – if the diameter always remains the same then we can imagine how a thinner top allows for more twist since it can kick out more at the bottom whilst a very thick top creates restricted movement down the shaft.
By the very nature of a holdfast the action of using it is quite aggressive. We have to hammer it down so that it forces itself against the hole’s wall in only two particular areas. In theory repeated use in the same hole at the same angle with a completely smooth shaft is going to distort that hole eventually. And in practise I can imagine this would become noticeable in a thin softwood top relatively quickly since it bruises easily but in a substantial hardwood top the holes will pretty much last a lifetime of use.
So what about the added texture? Well the first thing to emphasise here is that the texture is very subtle – the indentations are shallow and by no means sharp, this is not a cutting edge. It terms of friction it is little more than the surface of a fully hand forged variant which has been hammered from a lump of iron, rather than a smooth extruded bar.
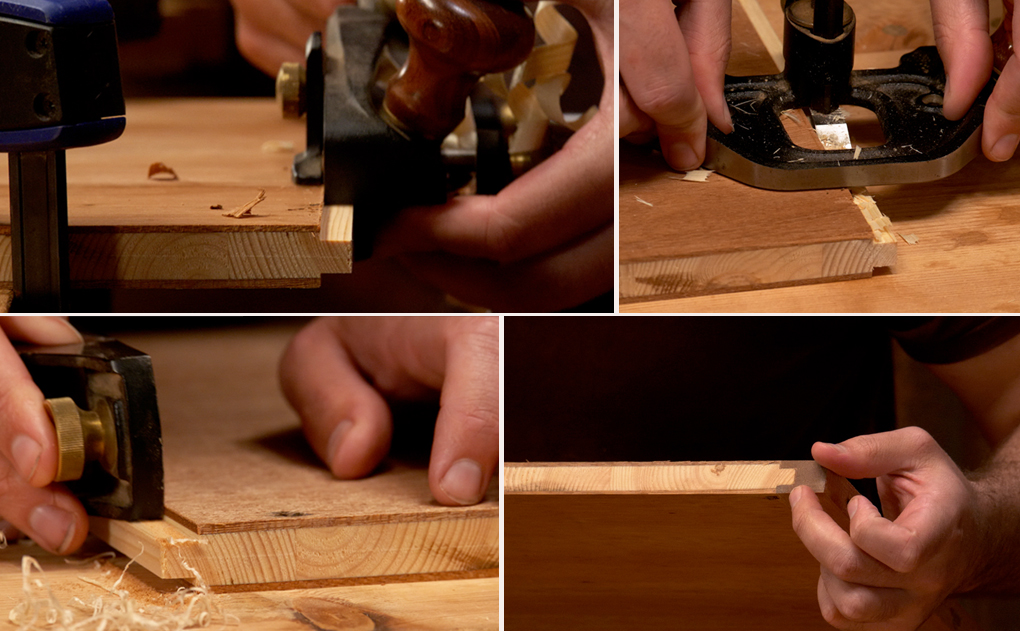
In a thinner top where your holdfast is already working a treat you won’t be concerned about making any changes however as you can see in the video the texture allows the holdfasts to get a firm grip in a 6″ top and without it it wouldn’t have been usable (unless a larger diameter of hole was drilled in the first place). Being able to achieve the grip easily without having to keep pelting the top down will in the long run reduce the amount of wear on the holes.
I really hope this answers some of the concerns but if not I will consider a full blog post on this. In summary having used holdfasts treated in this way every day working at my own bench I still had to re-drill the holes out this winter (particularly wet) as my dogs became a stiff fit.
Thanks again for your support.
I missed the second part of your reply to Michael – reading on my phone is my excuse. But thanks for the expanded answer. I’ll pass it along to the Galoots and see what they think. Love the benches (and the blog) – I’ll be watching for a free shipping to the U.S. offer. 🙂
Great tip and great video, Richard.
Thanks Paul 🙂
Great video Richard. Really informative and interesting and nicely edited too. Credit to your Producer! Keep up the good work, looking forward to the next one.
Cheers Matt, it means a lot 🙂
Nice job Richard 🙂
Thanks mate 🙂
Hi there,
Awesome tip, never thought of it. I use a workbench with, a 108mm thick top, dare I say it, made from stacked MDF. and since I put this top on have struggled with my holdfasts gripping, like they used to on my much thinner (about 40mm)rubberwood top. I shall now go and experiment and see if this tip will revolutionise my holdfasts again for me. At least until I get around to building a proper bench.
Cheers
Chris
Oh sorry forgot to add, the videos to my mind are great, its brilliant to watch a woodworking video where the host isn’t all holier than thou, giving commandments instead of instruction. Keep up the great work, look forward to the next one.
Au’revoir.
Hi Chris, MDF.. that’s the bane of holdfasts! If you manage to give this a go then we’d love to hear how you get on.
Thanks for your comments on the video 🙂
Thank you Helen and Richard for sharing this!
It was just what I needed. I recently got two holdfasts from Gramercy Tools, they are finally available in Germany. But my bench top is almost 5″ thick, so they wouldn’t hold fast. I sanded them but no better. So I found myself pondering on how to widen the holes from the bottom side.
But now it works!!!
Thanks so much again!
Nikolaus
Hi Nikolaus, you’re more than welcome! Thank you for letting us know, it’s great to hear that it’s worked for you. All the best.
Great tip!
Liked your video. Hipe there will be more coming.
The best with this one though was the music. Watched the video a few times before I realized I could use my mobile to tell me what that music was. Now I have been listening to Emmas music for a few hours. Why have I never heard of her before? Really appriciate you enlightening me.
Sorry for being so damn’ late (read spam…n’)
Nice studio , I see the barker is missing.
The punching idea is quite OK; Some low-grit sand -paper might work also , but the oak from the bench would finish -it quickly. If the hold-fast is not some special steel , would an 18 mm dia rebar (for concrete) iron be OK ?
Also , if the steel is softer , I’d try also punching with a chisel for metal.But your idea is great.
If I were among the first to comment , I said “-Nice video , Richard , keep’em commin’ !” Well I’m not.
But it will be a real pleasure to watch the rest of them.Thank you , Richard !
Sayonara (…?)
Hello Richard, thanks for the tip and your other vids.
Jean from France (Cahors).
Au revoir !
Hi Richard, Richard here 😉
I just wanted to ask you for some advice.
I have a bench about 2.12 in thick (54mm) thick. My dog holes are 20 mm throughout.
Doe you think the Gramercy holdfast will work here? Due to the smaller diameter (19mm) of the holdfast and the rather thin benchtop, am i likely to destroy my bench in short order?
Best wishes from Germany
Hello Richard,
What is the music? I love it! As well as the video and info of course.
My cousin is a blacksmith, and we started making some holdfasts last weekend. I have a two-inch thick ash tree bench top. We drilled in 20 mm holes. The material we had was 20 mm too, so we widened the hole in the ash. Worked fine. BUT then the ash (actually it was a stripe left of some 55×15 cm) split. The holdfast was used 90 degree opposite the grain. Have to admit I used a blacksmith mallet but not with much force. Now I am puzzled if that was due to the small size of the bench top leftover, the force or … Do not want to split my new bench top.
Best
Thomas
And thanks for the good content you provide!