
Marking tools are rarely given all that much attention, and they’re clearly not as exciting as the tools that get to see all of the action. But they are vital to our work and being able to use them quickly and accurately still requires good technique.
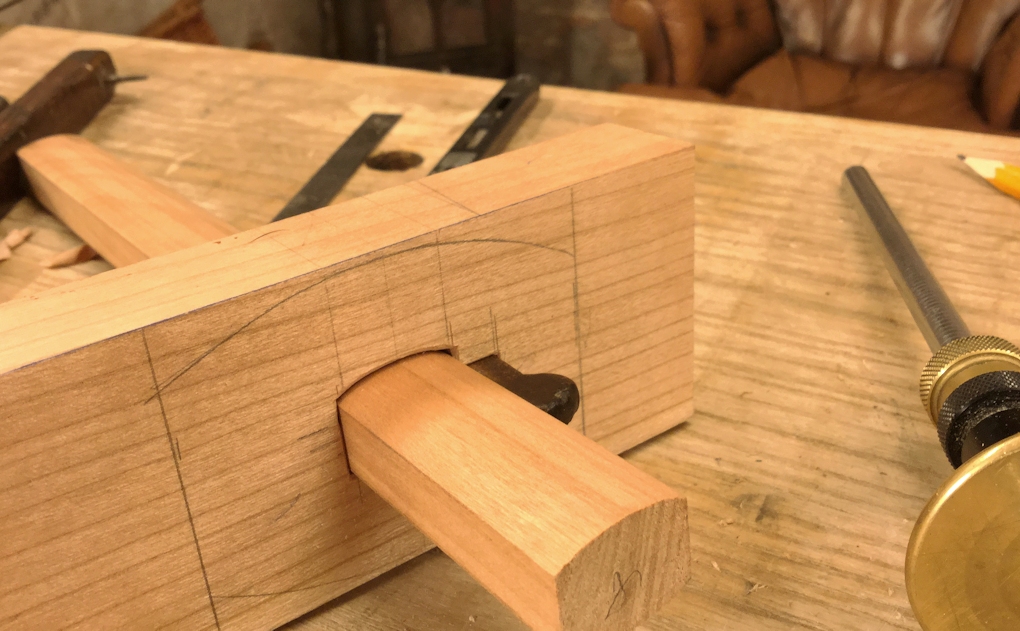
When it comes to marking gauges the traditional English pattern is my firm favourite but it’s a neglected design because it’s considered to be a faff by so many. The head in this style of gauge is held firmly in place by a wedge rather than a screw pin, and instead of sitting across the shaft (which is probably the obvious way to go), the wedge in this design runs along its length.
Like many of the English pattern tools, there’s a knack to setting them up, but once you crack it you start to realise that the benefit it gives outweighs any of the fooling around.
Fine Adjustment-
For me the English gauge allows the best, most accurate fine adjustment possible, and fine adjustments are of course essential to our work, when matching one component to another etc.
Most of the metal gauges appeal to the modern woodworker for there engineering-like ability to dial in micro adjustments with the turn of a wheel, but as a hand tool man I like to hit things to make my adjustments, and the marking gauge is no different. The setting up of the English pattern gauge is the part which turns most people off – you get it just in the right spot and delicately balanced, then shove the wedge home and the whole bloody thing moves. But it’s this gauge’s ability to micro adjust that I love the most, it allows you to set it up in the most accurate way with the tiniest of adjustments. You just need to know how to go about it.
Setting The Gauge-
Set the gauge so that it’s well under the measurement you’re after – an 1/8″ or so if you’re beginning, with experience you’ll get closer and closer to your mark off the get go.
Firm the wedge in, you don’t need to worry if the head moves a little.
Tap the wedge on the corner of the bench to lock it.
Now micro- adjust; tap the bottom of the gauge on your bench top and check how much it has moved. The vibration will send it heading in the right direction and you can will soon gain a feel for how hard to tap – incredibly fine and controlled adjustments can be made this way. Repeat until you have the exact setting needed and you’re ready to mark – the wedge will be set tightly. If you over shoot, start again, since hitting the top of the gauge on the bench will release the head.
Tap adjustments allow accuracy, and this design of wedge responds to them best.
Other Benefits.
Set with one hand – always a benefit when working. Gauges that hold tight with a wedge can be set up with only one hand, leaving the other free to stir your tea.
Wear resistant – the gauge I have was my grandfathers and I still use it daily. The design of the wedge going down the length of the shaft rather than across it means that it doesn’t wear and will last generations. With the cross wedge variants and the nature of our work, where often we’re gauging the same thickness time and time again, you end up wearing the shaft across that point which makes it difficult to set accurately at any increments around it. Any gauge that sets with a screw pin will have a similar problem and will require wear strips.
Glides along – I much prefer the lubricated feel of a waxed wooden gauge across my work, rather than the frictiony feel of metal.
Easy to make – this design is one of the easiest to make and on top of that the lack of wear means it’s practical to build in a softer timber such as cherry, which makes it even easier to cut everything out.
This style of gauge is certainly underrated and because of that you’ll likely find that used ones are available ten a penny or possibly a song. If you happen to know of anyone still making them then please give a mention in the comments below.
![Pt 2: Reamers & Tenon Cutters: Use & Applications [Shop bought vs Homemade]](https://www.theenglishwoodworker.com/wp-content/uploads/2026/06/355735B8-6EB7-48E7-8135-A45EC52D5F2F-400x250.jpeg)
![Pt 1: Understanding Chair Joinery: Tapered Round Joints | [ FREE 6 Part Video Course]](https://www.theenglishwoodworker.com/wp-content/uploads/2026/06/D4FD5406-5390-49FC-B939-255EFF4F845C-400x250.jpeg)
![Remove Saw Set = Improve Your Joinery [Video]](https://www.theenglishwoodworker.com/wp-content/uploads/2026/01/9D16FCB8-2406-4C54-93C9-550C75097009-400x250.jpeg)

Thanks for this one Richard, first gauge I have seen with the wedge going down the length of the shaft rather than across it.
Cheers Ken, it’s has somewhat been forgotten in favour of the cross wedge one, which I believe to be the American pattern.
I don’t claim this for fact but I’ve read that the cross wedge is a French design. I’ve been doing woodworking for well over 40 years in the US, I’ve never seen one in the wild. Usually I see the screw type. Always run across the screw type at antique stores, etc.
Many thanks for that David, that would probably make sense. The screw types, wherever you go, are by far the most popular.
Interesting blog Richard. I think I may have seen one of these in one of my grandad’s tool chests. I shall take a look when I get a chance and report back. There were many of the more usual gauges, some very fine looking tools with brass inlays but I am sure I saw one with a wedge.
The cross wedge version works well IF you have an additional saddle on top of the stem to transmit the force. The best gauges are the Japanese variety though…simple to make and they work better than any European style that I’ve seen or tried.
Cheers Rob, you know I’m waiting for my next life before I start with Japanese tools! Japanese woodworking has always fascinated me, I just need to find space in my fragile mind.
Very interesting and inspiring as always. Thank you Richard.
Just one question. Do you prefer a pin or knife for the marker?
Excellent question Mike, I prefer a pin shaped like a knife… more on this soon.
Pete Maddex makes ’em, maybe not commercially but he might be persuaded. I was given a fine pair (internal and external) in maple/rosewood. I’ll find him, he’s up your way Richard.
How did you find the twist lock one Douglas?
Thanks for the kind words Douglas.
A couple of pictures of mine on Photobucket and the original.
http://i86.photobucket.com/albums/k115/maddpete/DSC_0003-1.jpg
http://i86.photobucket.com/albums/k115/maddpete/DSC_0006-2.jpg
The are easy to make and adjust, and work well.
I am toying with ides of making a batch
Pete
Smashing looking gauges Pete, many thanks for sharing. If you do make a batch, let me know 🙂
I did a better photo of my Hawthorn and Rosewood ones ones.
https://www.flickr.com/photos/93829702@N05/20492809795/in/dateposted-public/
Hawthorn is a nice wood for tools, it also makes great mallets.
Pete
Pete
They look wonderful and as you say a much better photograph. Hawthorn looks very good. Not sure I have seen hawthorn being used before but a great use of a native species.
Len
Hawthorne was used for blocks on ships, it’s tough stuff with interlocking grain.
Pete
Just watched the video – love the explanation for the DIY video. It played back ok just different sound levels. So 13 “twattings” equals about 1/8th of an inch. Love it. 🙂
Ha ha. Yep a twatting’s slightly larger than a nadger! Sorry, I had thought I’d said tap it, but no Helen to guide me…
“It’s easy when you know how.” Thanks for these clear explanations.
I agree on the benefits. One drawback of this model is the large top. You cannot use it in tight spaces because it’s half a wedge too long.
You can make yourself one with a long shaft, and two heads. One fixed head with a pin, a sliding one with a pencil. How’s that for compasses.
I think I should make one for myself.
Around me (Estonia) it seems that the traditional gauge is using very similar technique. But usually have two stems. But the same along the stem wedge.
One picture: http://vanavaraantiik.ee/216-pos_thickbox/roobits.jpg
Good observations with the half a wedge too long, that’s one of the reasons that I still like my wheel gauge.
Word of advice, next time wait for Helen. Lol
Cheers Christopher, that was the plan, but it felt like an eternity!
I made mine the same way (wedging lengthways) just because I thought it was the easiest way of doing it!
I don’t know, Richard. I love your perspective on the craft and have learned a lot from you but somebody’s going to have to pry my Tite Mark out of my cold dead hands. I am a seriously inefficient woodworker, which is one of the benefits of being an amateur but I can set my TM in about the time it takes you to establish your initial setting. If speed is life then there is actually one thing I can do faster than you. Set a gauge.
Keep this up though. I love your blog and perspective. And don’t let anyone rub your nose in the video quality.
Eric
Ha ha, cheers Eric, I’ve heard wonderful things about the Tite Marks although I’ve never actually used one. Many thanks.
Well, heck, I liked your video. Content is king and that is certainly there in this one. I would rather have more than fewer! I am, as I am also a ‘..seriously inefficient woodworker..’ (loved that, by the way) but I do love to fiddle around with stuff. I have an old’ish wood gauge with a twist lock (bought at a ‘boot sale’ as you’all would say) and brought back from the dead and a more modern metal one. Rather prefer the old wooden one. Want to make one (or more) one of these days. Tommy Mac (‘Rough Cut’ TV show) uses wooden marking gauges with the twist lock but also ‘taps’ the end to get it set dead one. Then a final twist and he is off to the races. A hybrid solution, I guess.
Very interesting Bob, I don’t have a lot of experience with twist locks but must admit they make a lot of sense.
Richard – I had an opportunity to sneak away into the workshop and so far found two traditional English pattern gauges. One with its wedge and stamped with my grandfather’s name on the gauge and the other has lost its wedge and stamped with someone else’s name I don’t recognise. The wedge that is there is considerably smaller length than yours so not sure whether it is the original or not but looks the same species of wood. I will take a photo later and email to you.
I tried your method in establishing the correct distance and it worked a treat taking five taps to get spot on. So there is another lesson learnt from you. I do wish I had watched my grandfather working when he was alive. But you don’t think of these things when your young. Such a shame but I do recall he once made me a wooden wheelbarrow, together with wooden spoked wheel, when I was about 5 years old. I had it for years before it rotted away by being left outside. Anyway I digress. Back to my work.
Hindsight is a wonderful thing!
I’ll eagerly wait for the photos, it’s wonderful that you managed to find one. The smaller wedge – it could just be a preference and it’ll probably be less cumbersome. Either way I’ll look forward to seeing it.
Well I never. I have never seen or even come across this type of marking gauge. Where have I been? Will defo be on the look out for one now or even make one?
Hi Allan, it’s funny what one thinks is common another has never seen. I’ve got a little make video coming soon, although I warn you now it’s one of my diy videos!
Fishing through my grandads old tools last year I found several marking gauges and one of these with the wedge. I’ve been toying with the idea of making my own following a similar design.
Hi Ian, I’d certainly give it a go, I’ve just finished one and I found it a very enjoyable build.
This was the first thing I had to make at furniture makeing collage in Hereford a long time a go and I still use it now
That’s wonderful to hear, still going strong I hope?
Hello!
I’m regularly looking through ebay UK for woodworking tools and don’t recall seeing a marking gauge like this, but panel gauges all the time. I actually don’t recall seeing a vintage panel gauge without a parallel wedge. It makes me wonder why is it so… Are the “english style” marking gauges so rare…or is the wedge so often gone missing, like Les noticed, that nobody’s trying to sell them?
Kindest regards!
Hi Lukasz, they seem fairly common around my parts but seemingly nowhere else. Having the parallel wedge in a panel gauge makes sense as the more force you apply to these things in use the tighter it becomes, and you need a panel gauge to lock tight.
We have a little make video soon so you shouldn’t need to search 🙂
As it is luck, I am making one today for a frend on the west coast. It’s the only type I own, three of them came from my grandfather and are over a hundred years old. All three are made of white oak and as hard as nails putting a new scribe in one is hard. All three show little where , but have seen use most days
great video as always
Frank
Thanks Frank, it’s lovely to hear another supporter of these gauges. I’ve been quite surprised how many people have never even seen them. Great to hear of such old ones still in use.
I bought one of these in a junk shop, wiped the grime off and then gave up on it within 5 minutes. I’ve knocked of things to adjust them but never thought to knock them against other things (like a bench top). Like another recent video, it cleared up a mystery, why my tools are worn but don’t seem to have a bunch of hammer marks on them.
Hi Paul, hitting stuff without hammer is never as intuitive! It does still work very well though.
I have never seen this style in the wild, here in the US. Stanley wooden screwdowns by the ton, in a variety of patterns, all priced as if they were the last on Earth. The rare steel bar version generally comes cheap.
My next may be one of these. Easier than the first I made, and still use, with a scalpel blade for a marker, clamped to the end of the beam with a hunk of scrap steel, and the guide in two pieces held with bolts and wing nuts. I actually generally adjust it the same way as you show with the bolts barely snug, but snug the bolts hard after to avoid slippage.
‘Priced as if they were the last on Earth’ – that seems to be becoming all too common!
Hitting stuff really is one of the best ways to make micro adjustments, even though it sounds crude!
What kind of angle is on the wedge? Looks like a 1 in 7 like everyone swears dovetails have to be.
If I thought I could get away with being in the shop and not handling the baby this evening, I’d be making one or two right now. I’ve been meaning to for over a year, and I have some beautiful maple and walnut sitting there just begging me to do something fun like this with.
Hi Glen, we have a little video and plan that will be on shortly so I’ll get some angles on that for the wedge. I’m sure that wood will make a wonderful gauge if you ever get the time to make it!
Man, not that bad for self made 🙂
Great advise. Thanks for sharing.
Cheers,
Stefan
Looks like it would lend itself to a panel gauge very well, might try to try it…?
Thanks for bringing that design up!
The first gauge I made was from Charles Hayward’s 1945 “How to Make Woodwork Tools” (free PDF download here… http://toolemera.com/Books%20%26%20Booklets/booksplans.html), and it’s just like yours, Richard. He shows a couple different ones in there, the wedge-along-the-length style on page 50, and then both a thumb screw type and a wedge-across-the-arm style on page 39. But I chose the make the kind like yours, as it seemed easier. Other than making the angle a little too steep, I like it and reach for it over the other, fancier gauges I have.
Thanks for the link. Lot of good reading!!
Douglas – thanks for the link. An interesting read.
Len
HI Richard,
I don’t know if you remember the pictures I sent in an email at the end of October last year of some of my favorite tools and a couple marking gauges that I made . Anyway, I was real proud that I was able to make those marking gauges but now that I see the gauge you are using, I realize where there are serious shortcomings with the two gauges I made. Mostly they have to do with the shape and thickness of the wedge. Now that I can see the difference and got a good look at your English style gauge, I am going to try again. This time though, I will cut the hole and slot with hand tools rather than use the method I did for the other two I made. I’m glad I finally got to see your gauge somewhat up close.
Thanks
Mike
Had no problem with photobukt, but fliker failed!
Like the English one, will make one if l need more….
Probably should be able to figure this out, but can’t – how do you round the top and bottom of the mortise? I have chopped square mortises for gauges, but don’t know exactly how to round them. Do you use a gouge? Any help would really be appreciated.
Thanks,
Kenny
Use what ever you have to hand, gouge, half round file, sand paper glued to a shaped stick etc.
Pete
The design looks simple enough that even I could work it out, but do you have any advice or designs to follow on making my own?
Fantastic site! Blog, video, etc. My head spins at the possibilities!
Thank you Richard! I’m on a short break in Newport Pembrokeshire and bought one of these gauges in an antique shop today for £4.50. Now thanks to you I know how to set it properly.
I saw the post on “The Good Gauge” and I would like to make one. Quickly searched your site but didn’t see any video of how to make it. Some of the comments showed other versions but I like yours the best. Got video?
I was inspired. Have ordered some African Tambootie to make the head, and Indian Ebony to make the shaft and wedge.
Just need to search out the info on pin profiles now.
Thanks very much for this Richard. My wife gave me an English pattern wedged gauge for my birthday today. Stamped “F Douglas”, it has a long blade with a double edged point ( like this V ) so it will cut on both a pull and push stroke, and sharpened on one face so the side against the gauge block is dead flat, and this is also held in place with a wedge. The blade is almost 2″ long, so should last many years of sharpening 🙂 The gauge looks unused.
I look forward to ‘tap’ adjusting it, and laying out my work with it.
Cheers from Australia
Duncan
A fellow hand tools devotee.