I’ve decided to write a full review on the Veritas Inset vice shortly since the idea was kindly recommended in a comment by Bill (Billy’s Little Bench) last week. For now though I’d like to share a quick extra step that I take when I’m fitting one of these vices.

Since introducing our Little John Workbench I’ve had a lot of these vices to fit and as far as tail vices go this has got to be one of the simplest options you have in terms of installation. It’s unique design does however give it one slight draw back which niggles a little.
The problem won’t become a problem until down the line when you need to flatten your bench top and since the body of the vice sits flush with the top it needs to be removed before you can get to flattening. This can be done in seconds as it’s only a case of removing six small screws and lifting it out so no hassle there. It’s when you go to screw the vice back down that you’ll notice the problem because it’s now going to sit a tiny bit above your newly flattened worksurface.
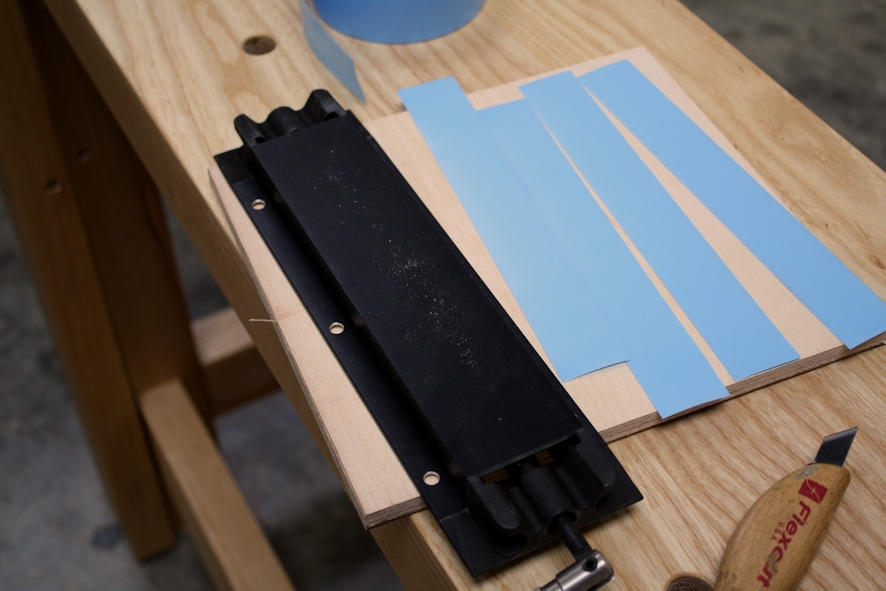
You can’t really sink the vice down lower from the off to allow for this because you want it be able to support your work; I always fit it to sit just a gnat’s nadger below. So the extra step which I like to take is simple and it gets rid of any headaches down the line. I cut my the recess for the vice out deliberately too deep and then pack it up to the right level with a bundle of packers.
I use a packing tape but you could use anything you get hold of such as paper, cardboard, veneer, sandpaper; pretty much anything thin with an even thickness. This doesn’t need to be stuck down as the vice will hold it in place but lay down several layers to pack the vice up to sit flush. When the time comes around to flatten you can simply take down a layer as required so there’s no need to reach for any tools.

This is one of those problems that’s not actually a problem but as woodworker’s we’re natural born thinkers and we do like to find a solution anyway. If you’ve been eyeballing this this vice for a while but felt a bit concerned for this very reason then I hope this little extra step will remove the worry.
Update: At the present time we’re not building any workbenches for sale, however we have many resources on this website that will help guide you with your own workbench build.
Our English Workbench Video Series takes you step by step through a traditional bench build, starting out with a discussion on choosing the ideal dimensions, demonstrations of how to cut the joinery, right through to flattening your workbench top and building the face vice from scratch.
If you’d like us to guide you through your build with detailed videos and PDF plans, then you can find full details for this Workbench Series here.
![Simple Work Holding For Ploughing Grooves [Without a Tail Vice]](https://www.theenglishwoodworker.com/wp-content/uploads/2022/07/workholding-without-tail-vice-copy.jpg)
![Gluing Up A Workbench Leg [VIDEO]](https://www.theenglishwoodworker.com/wp-content/uploads/2022/06/gluing-up-a-workbench-leg-video.jpg)

Nice idea!
Thanks Richard, great Idea buddy. 😉
Installed my veritas insert vice there today to finish off my bench build. Then picked up the bench by getting under it and standing up, in order to carry it to the shed.
And it promptly went arse over tit backwards, taking me with it and landing on the handle of the insert vice. Between wood, metal and me, that had to be the best part of 500lb hitting it after a four-foot run-up to the ground.
It still works perfectly. Bit of a dent, the last inch of the shaft is now at a 15 degree angle to the screw and the handle’s scuffed, but it’s completely functional, turns perfectly smoothly, no cracks, nothing. I’m hugely impressed.
http://www.stochasticgeometry.ie/wp-content/uploads/2016/09/2016-09-18-13.38.59a.jpg