Wooden planes can be quick and easy to restore compared with metal ones, as material can be removed quickly with sand paper and chisels, unlike the relatively slow material removal when working with metal. By the same nature though, wooden hand planes can often be extremely worn and warped, which can make things difficult for a beginner like me. The best solution is to go out and see the plane before you buy. Often old wooden planes can be found very cheap and in ready supply at junk shops and car boot / garage sales, if you’re in the right area.
Sole flatness can be restored relatively quickly, but key areas to check for are how well the iron seats on the bed of the plane, and how open the mouth has become through wear. For a smoothing plane, a worn mouth can be a problem, particularly if the plane has a single iron. If you’re not sure what this means, or why it’s a problem, then have a little read here about mouth widths on hand planes.
Avoid buying a wooden plane that has a wedge that feels like it doesn’t belong to it. Chances are it doesn’t, and you’ll struggle to get it working well.
 I was fortunate to have Richard on the look out when I was buying my old hand tools, and he picked me out this lovely little wooden smoothing plane, that was in great condition for it’s age. He felt the restoration should be simple, and so he left me to it.
My instructions were to take back any grime and residue built up around the plane, and then to flatten the back of the iron along with the plane’s sole.
I set to with some very fine wire wool giving everything a quick clean over.
I didn’t want to take back too much of the patina on the plane body, so I was gentle, and a swift wipe was enough to see the wood re-emerge – a lovely piece of quartered beech.
The mouth of the plane needed extra attention where dust had become caked up tightly in the corners. This was an important area, because if I’d left it, it would cause a problem later when seating the iron in nice and flat.
Truing the back of the iron was by far the most lengthy procedure in the restoration.
I had the option of a water stone grinder but felt that I would ruin the whole thing if I used something fast cutting – I really wasn’t confident about holding the iron flat, and for good reason.
I started out with 180 grit paper on the granite slab and my pile gradually increased right through to 2000 grit.
If you’re going to do something similar for the first time then I would point out that sticking the paper down to the flattening plate securely, would be a very good idea. I may have received similar advice but it went straight over my head, and I only held the paper down loosely with a bit of suction from wetting the underside. The paper curled up at the corner, but I carried on regardless, back and forth over and over.
When I stopped to check on progress it was apparent that something wasn’t quite right, perhaps it was the curling up paper or just poor technique, but I had managed to curve off one of the corners. This wasn’t the only issue. After revealing some nice fresh steel it had become clear that the pitting in some areas was deep – I called out for help.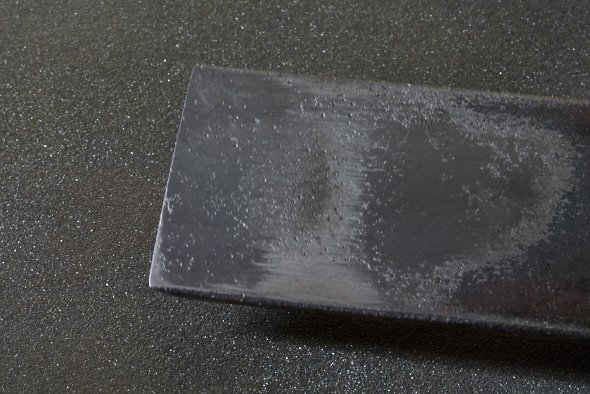
I was shown a better technique for holding the plane iron while pushing. This was to turn the iron to a diagonal position rather at 90 degrees, and focus on making nice long strokes (instead of many short ones) with a stronger down force on the push than on the pull.
I gave things another go and saw some improvement in the corner but the pitting looked like it might defeat me. Richard came to the rescue with the grinder to speed things along, he held the iron flat against the side of the stone and in just a couple of minutes the pitting was removed. It’s definitely a bonus to have access to the grinder for restoring old tools like this.
I was told that I didn’t need to flatten the whole thing, the first 2″ was enough, so it was now ready to go back to the flattening plate and work up the grits.
I was advised not to spend too much time on each grit – once I could see even scratches across the surface I was ready to move to the next. By the 400 grit I could feel a noticeable difference, it was smoother to push and the scratches became less visible, the surface looked dull and even.
I was conscious the whole time of keeping the iron flat so that I didn’t ruin the edge again and create lots of extra work. Slowly though the round over returned, it wasn’t as bad as before but this time it was on both sides. I’m still clearly no expert, but hopefully it will be a lesson well learnt. After a slapped wrist for shoddy technique I was able to improve on things, and with a lot of concentration I was able to reach 2000 grit with the iron (almost) straight at the corners and lovely and polished.
I needed to turn my attention to the sole of the plane, which was a similar but much faster process. I started and finished with 120 grit sandpaper which I was told was ample since the sole of this little smoothing plane will become burnished through use. This small, wooden body took less than 3 minutes, I simply pulled it back carefully along the sandpaper until the darker, low spots were gone.
With everything prepared I was ready to get some further guidance in creating the bevel and sharpening the cutting edge…
![Pt 2: Reamers & Tenon Cutters: Use & Applications [Shop bought vs Homemade]](https://www.theenglishwoodworker.com/wp-content/uploads/2026/06/355735B8-6EB7-48E7-8135-A45EC52D5F2F-400x250.jpeg)
![Pt 1: Understanding Chair Joinery: Tapered Round Joints | [ FREE 6 Part Video Course]](https://www.theenglishwoodworker.com/wp-content/uploads/2026/06/D4FD5406-5390-49FC-B939-255EFF4F845C-400x250.jpeg)
![Why and How to Blunt Your Chisels [VIDEO]](https://www.theenglishwoodworker.com/wp-content/uploads/2026/06/26269099-F519-415D-9196-5BF152B10DFF-400x250.jpeg)

Excellent! I’ve wondered how important a grinder was in a wood shop. Now I know I truly need one. Thanks Helen.
Thanks Rick, for a job like this and also for re-grinding the fresh bevel the grinder really was welcomed (along with Richard’s help!). If you plan to do a lot of restoration work then I imagine it would earn it’s keep.
thanks for this Helen i have a few of these i need to get done this will give me the jolt to get them done
Great post, Helen, and very useful for those of us who have to refurbish old tools from time to time.
Did flattening the sole open the mouth of your smoothing plane too much? If so, perhaps you could explain what steps you took to address that?
Looking forward to the next instalment.
Kieran
The mouth isn’t particularly tight on this plane, but it was like this prior to my interference and Richard had said this wasn’t too much of a concern. The work which was need was very minimal, probably because the plane is so small, so there wasn’t very much material to remove.
With regards a slightly open mouth on a smoother, all I can say at the moment is that this one is working very well… perhaps I might understand why later on, but I suspect a lot of it has to do with choosing a good candidate to start with.
Yep, I have the same thing happen when I use paper on granite or glass without adhesive: Turned corners. Just the lightest mist of spray adhesive on the back of the paper will do, but even then I find I have to be careful with paper or the corners round over.
On a smoother, those turned corners wouldn’t bother me at all. It may help you from getting lines at the edges of the blade on wider work, sort of like cambering the blade. On a chisel, it would upset me.
Nice work!
Thanks Ed, a gentle camber is what excused me from not achieving a perfect result 😉
I have one of these I already did that restoration work to, so you have my sympathy. However, on mine the blade keeps coming loose in use, no matter how hard I drive in the wedge. I keep meaning to try to cure that, I hope you don’t get the same problem!
Just a thought on the “blade keeps coming loose” problem. Is the blade tapered along its length with the thin edge being opposite the cutting edge? Most wooden plane blades were traditionally wedge shaped themselves. I know Lee Valley sells replacements blades of that sort:
http://tinyurl.com/ms6h8y8
I did have a slight issue with this to begin with and it was resolved by a little bit of work to the wedge.
This is a most satisfying job to have done, you have given new life to this plane, well done, you saved it from being turned into a “book end”, as so many of them are!
Thanks Chris, I’ve become very attached to this little plane since restoring it so I’m very pleased it’s now able to get some use again.
Doing this right now for a 22″ jointer and a couple of moulding planes. Nothing like refreshing a 100 year old iron and plane body for regular use in my shop….
Helen
As a tool diemaker & hand tool woodworker, flattening should be done wit diamond plate or flat stone, use of paper(or cloth back) abrasives there is always a ” pressure wave” in the paper as the steel is pushed back and forth! This is true wit belt sanders also.
Keep up the fight!
Thanks Paul, I can certainly see the benefit of have something solid to flatten on without the need for the curling paper, I would likely have had less of a struggle.
Regarding; mouth clearance it appears that this was done previously by adding thicker iron, I have used this method and or veneer glued in the bed. If it is to big you can make a scrub plane.
Well done on firstly getting the pitting out of the blade as an iron will not sharpen with pitting in the way. Secondly the iron needs a slight camber for a smoother size plane no matter if it is wooden or iron, not as much as a jack plane but some to eliminate plane tracks in your work. On the plane body itself, try and get it as smooth and even as possible on the bottom. Remember there is not as much plane body riding over the surface compared to a jack or trying plane so you want to use the whole plane sole to ensure that everything is true on your work piece. My 5c has run out so I will sign off now. Go the woodies!!!! once you try woodies you will never go back……..
Well Helen, it just goes to show you what a small world we all live in. Because I to have been having very similar problems with my old No4 plane, and I to, had to go looking for help, in the form of my next door neighbor’s farther who is a fifty year plus, master carpenter (and still working Part-time).
He is a great old guy and is always happy to help me when I’ve made a pigs ear of a some little woodwork project I’m working on (which is more often than not). As I needed “putting straight” just the other day, because I’ve been trying to grind flat and sort out the plane iron in my old NO4 plane. Which he has now shown me, just how to get it “bob on” perfect.
Keep the Articles coming, I enjoy the read
Regards, and best wishes to you both.
Pete Maddock.
I have been a woodworker and tool collector for over 50 years now. I have a lot of wood planes I have picked up over the years. I have found that I need several diamond stones to level the back, and sharpen the blade before going to a water stone for the final finish. I am much more aggressive than you are in cleaning and repairing the plane, I am using them, so want them to look nice. One thing I have found of interest over the years are the planes that have worn down so much that the mouth was to open to work right. Many of these planes have had inserted a inset of hard wood to close the mouth again, and assist in leveling the sole. Several of them use Lignum vitae as the fill wood.
Nice work. It is certainly worth the time in my opinion to work the back.
I know this is an old post, but felt it needed a comment anyhow. Good on you Helen, with or without Richard standing nearby, you didn’t give up and head immediately to the high powered tools or just give up completely!! Hooray! We have all been in this position before, and not unlike Richard I decided several years back if my Grandfather or my old dad didn’t need power tools and belts/braces to sharpen, then why should I? It took a while, but I am so much happier sharpening freehand and it is so much quicker too. A few minutes, the tool is sharp …. I got a break for a cuppa and all ready to get back to the work. Welcome to the tradition ……