I first bought my bevel up Jack for planing end grain on thick workbench tops.
I’d always been a normal steel, conventional plane kind of chap before building workbenches, but hand tools can moan and groan a bit at certain woods and I was building workbenches with a lot of kiln dried ash.
A few specialist tools made a huge difference, and my Veritas bevel up plane was perfect for all that thick end grain work.
The Attraction Of A Bevel Up Plane
That’s my particular love for these bevel up planes – they’re excellent for the low angle stuff.
And of course there’s a lot of people who love them for the opposite end of things – the high angle smoothing.
This is the attraction of a bevel up (or low angle) plane; that ability to change the cutting angle to these two extremes.
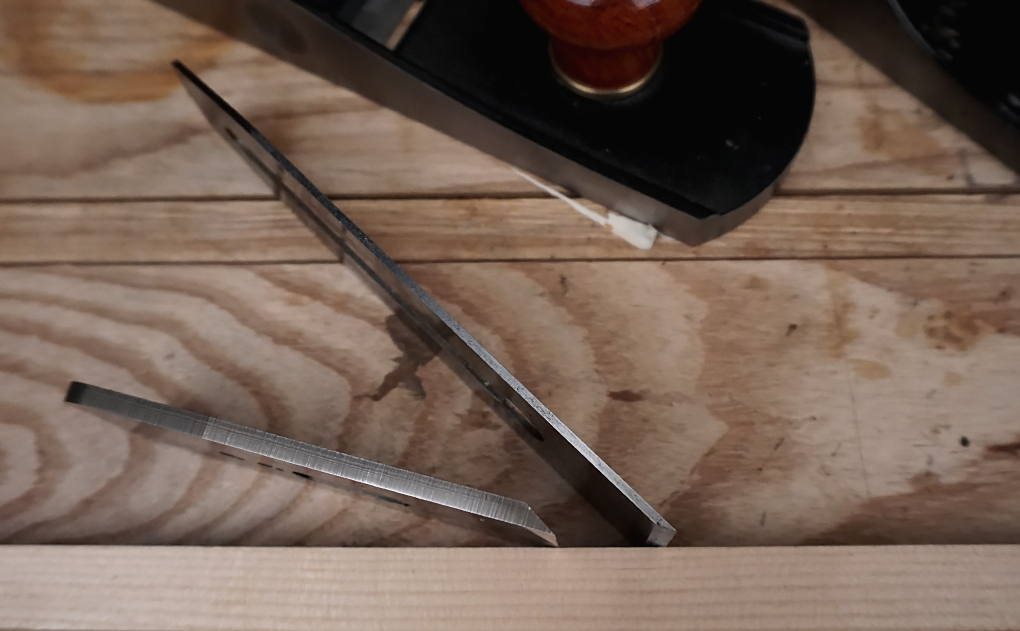
The bevel up plane iron (left) goes in to the plane with the bevel facing upwards – hence the name. Another unique feature is the low angle that the iron is held in the plane body. This combination gives the ability to sharpen the iron at a wide range of cutting angles, which makes the bevel up plane ideal for taking on more challenging smoothing tasks (using a high cutting angle) along with end grain work (using a low cutting angle).
Limitations Of The Bevel Up Plane
There is a place where I question the ability of the bevel up plane though – and that’s just on the versatility thing.
You’ll often hear that these make such versatile planes. And they do, at the ends of the spectrum.
But a lot of the time people forget to consider the middle ground. It’s just so very middle.
We always think of extreme. We always think of the problems.
If you work almost exclusively with hand tools, then the middle ground accounts for most of the hand planing that you’ll do.
Taking rough through to general shavings, all with an iron that’s cambered by varying amounts.
It’s the cambers that separate the bevel-up from a conventional plane when it comes to the middle ground.
And it’s the conventional plane that wins.
Understanding iron cambers is vital when learning how to use a hand plane efficiently.
Thick Iron, Hard Steel + Bevel Up. A Bad Combination For Cambers.
The bevel up plane seems to be in it’s own realm when it comes to iron thickness. They are monstrous.
This alone makes sharpening these plane blades a chore. Add in a camber and that chore becomes an overwhelming job.
Cambers on a bevel up plane iron are just awkward. They need to be more exaggerated so there’s a huge amount of material removal to deal with.
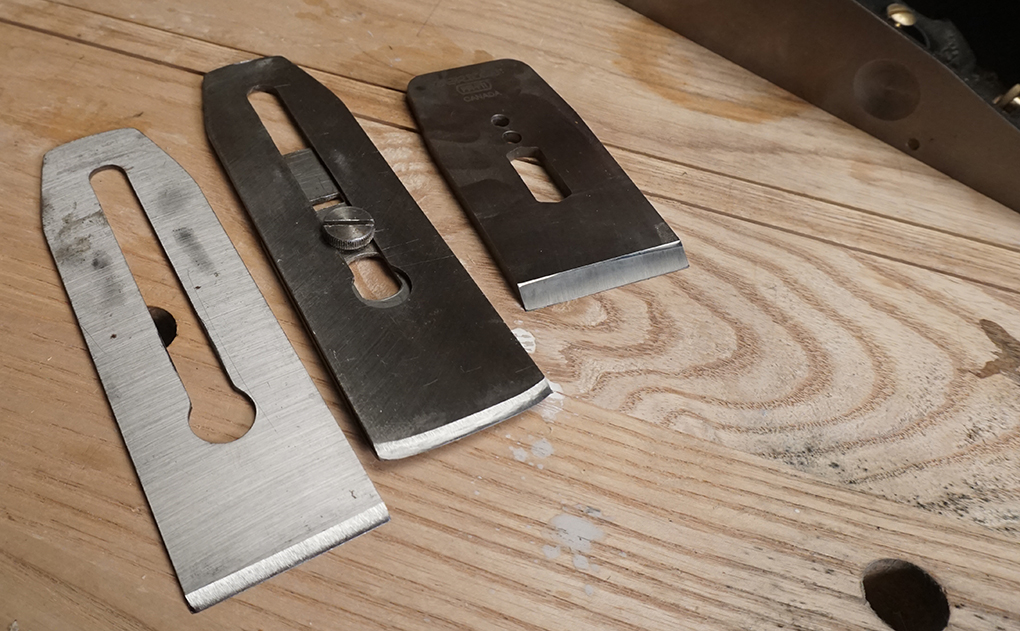
I find varied cambers incredibly important for taking on the full range of hand planing. Bevel up plane irons are a faff at best when it comes to medium to heavy cambers, so I reserve this plane for smoothing.
I’m not saying cambers can’t be done on these planes.
But fiddling about with cambers on my normal thin irons is no harder than the standard sharpening routine.
The Importance Of Keeping Sharp.
The sharpness and set up of your tool is ultimately more important than the tool itself. And getting sharp is such a regular event when building by hand.
Getting sharp has to be a reaction.
If it becomes more like an ordeal, or even just a pain in the arse, then I’ll think twice about it. And then I’ll have a pot of tea, and it’s all down hill from there.
Setting and sharpening cambers is so easy on my Stanley, that I don’t even consider the Veritas bevel up when it comes to the heavy or medium planing tasks.
For my furniture making I find my Stanley no. 5 truly is versatile, and can deal with every part of a build. I can get by with this one tool.
I can’t deny though that bevel up planes are wonderful at the extremes. Nothing can plane end grain like a low angle – it just can’t be done.
I really don’t think you could beat the Veritas bevel-up Jack when it comes to shooting.
So if you use machines for the majority of your prepping, then the bevel up plane may be that ‘ultimate versatile plane’.
But if you’re thoroughly hand tool woodworking, I do think you’ll always want something like a conventional Stanley no. 5 as your foundation, and then you can work around that.
And if you want that Stanley no. 5 to become a smoothing plane as well, you just need to learn how to use the cap iron.
N.B For a thorough understanding of your edges, including how to sharpen efficiently, understanding the sharpening kit, flat backs, creating cambers, knowing the optimum cutting angle, different set ups for different tools…
Basically, to learn everything the hand tool woodworker needs to know about Sharpening plane blades and chisels, have a look at our ‘Get Sharp’ Video Series (watch the overview below).
[vimeo 201108632]

![Which Saws Are Best For Ripping Thick Stuff? [Video]](https://www.theenglishwoodworker.com/wp-content/uploads/2022/12/what-hand-saw-is-best-for-thick-rip-cuts.jpg)
![Quick Homemade Clamps – Small & Large [with video]](https://www.theenglishwoodworker.com/wp-content/uploads/2022/08/how-to-make-your-own-woodworking-clamps.jpg)
Merry Christmas to you and Helen.
As you know I always look forward to any new series from you but is there any good news you can share on the Plane Build videos?
As always your knowledge and down to earth plain talking makes much sense. An interesting article.
All the best for another successful year to you both.
Len
Thanks Len,
The plane video is also on it’s way, seems pointless to apologise again for the delay, but just life doing it’s thing and getting in the way. It’s all but finished though.
Have a great Christmas!
Great news Richard and we are very patient as we know how good it will be when it is released. Wood has been seasoning well and irons and cap irons safely stored away waiting for their day.
Len
Yes, you want to use these for finishing purposes only.
Even more so when you throw “clearance angle” into the mix.
Unless you enjoy working metal more than working wood.
Merry Christmas and a Happy New Year to you both. You are very welcome. Thank you.
Well, blast. A low-angle for shooting, eh? Maybe I should have asked for one for Christmas.
I’m in agreement about the Stanley/Bailey planes. I have 7, 6, 5, 4, and 2 #3’s, a couple of block planes, and an assortment of filister, plough, shoulder, rabbet, etc., and a few self-made Krenovs. I estimate that 80% of my work gets done with the 5 and the 3’s. Your mileage may vary.
Wishing you both a very happy Christmas and a successful New Year.
Some of my low angle block planes have a camber. It seems to change the cutting angle, making knots easier to deal with.
MERRY CHRISTMAS
New video series you say?
*readies credit card*
What’s the topic? 😀
I own this plane an I love it. in fact I only own three metal planes and they are all low angle (jack, small smoother and block plane). I find low angle jack a precision plane. For rough removal they invented toothed blade but I am yet to try it one day. And yes it is not suitable for heavy cambered blades. But it anyway hurts me if I have to attack a board with such a nice plane. I prep my boards with a machine and then clean it with a jack. I also find that it is a bit heavy to do raised panels for example.
Merry Christmas to everybody. May Santa bring you all a low angle jack.
I also agree the old stanley’s are better to use due to their light weight, chipbreakers that you can hone a small steeper secondary degree bevel and eliminate tearout entirely and not to forget their thin irons that are so much easier to sharpen than the modern thick A2 steel.
I also have a Veritas shooting plane and besides the iron which takes a lot to sharpen I reckon this plane out benefits the low angle jack 1000 times over. Shooting end grain is such a pleasure and most of the time effortless.
i still can’t seem to get my head around low angle, high angle, bevel up, bevel down .i own a veritas jack(bevel up) and two stanleys a 4 & 5 . i know i’m sharp but angles and chambers seem to go over my head .for example. yes the veritas works great for shooting but at what angle ? does it depend on the wood been shot? do you open the mouth full or is it better tight ? its hit and miss with me trial and error .
the internet is full of projects to be made but very little about setting the tools right to make the projects more enjoyable. that’s why i love this channel you give that insight .i.e having a chisel sharpened up dead square to chop a mortise. .thanks. a simple thing but it makes a huge difference. hope you do a sharpening vid for us.
happy christmas.
dave
I just want you to know that I sincerely enjoy your posts. They always seem to make sense, and are relevant to my needs.
Thanks, and happy holidays.
Mark
I think you are right. It is very tiring to read the people who take absolute positions with regard to bevel up and bevel down planes.
The Veritas LAJ has become my most used plane. When I started woodworking about three years ago, I was advised to get a Bailey style #4 and essentially I couldn’t get it to work decently: it was hard to turn what I read in the books into practice. Than I saw the LAJ in a tool shop and I could see how it worked just by looking at it. I’ve put a very slight camber on the blade which makes bringing edges down to square a fairly straightforward operation. In severe cases of out of square you can just shove the blade into a skew position using the adjuster.
In short this is my plane for getting everything generally flat and I don’t care if there’s a bit of tear out because I take care of that with a Bailey style jointer which I always use to get real flatness. (I’ve managed to crack the mysteries of Bailey planes but I reckon I couldn’t have done it without developing an understanding of planing itself via the LAJ). In my humble and untutored opinion, the LAJ is the definitive beginners plane because it is mechanically simple and seriously effective.
Merry Christmas to you all! Look forward to what the new year brings. Just made your English style plank bench and so far the test drive is pretty sweet. Thanks for everything
May you and Helen have a very Merry Christmas and a happy, healthy and prosperous New Year!
Cheers!
I have owned a low angle jack from both Lie-Nielsen and Veritas and they where both great to work with. I particularly liked how they felt with a low center of gravity. However I never found that they cut end grain much better than my sharp Stanley planes. The 12 degree bed angle and the 25 degree primary bevel with a 5 degree secondary gave me a 42 degree overall angle. That just wasn’t enough difference from the Stanley planes to make a huge difference for me. The back bevel issue with a low angle is a pain as well, but if you plane like Richard where you turn the plane sideways as your return the plane to is starting stroke, I think this would be a non-issue. Something I am doing now with Richards great video instructions.
I recently purchased a Veritas custom No. 5 and really enjoy it. I wonder if a 40 degree frog in that would do a keen job on end grain? I’ll have to try it out!!
Thanks Richard and Helen for all your great videos. I just purchased all three and can’t wait for new ones to come out. Happy Holidays!!!
Brett
Hi Richard. Merry Christmas to you, Helen and Jeremy!
Out of curiosity, have you tried making one of your (bevel-down) wooden planes with a 40-degree bed angle? In principle, it should cut end grain just as well as a bevel-up plane with a 12-degree bed angle, while having all the nice sharpening properties of bevel-down planes.
I’m feeling like a simpleton, but I’m not getting how a bevel up requires a more exaggerated camber to match a bevel down (but I know it must be true).
In the instance of the first photo, showing a BU next to a BD, let’s presume both of their effective cutting angles are identical. Wouldn’t the radius of the bevel be the same regardless of which side was on the wood??
My lack of understanding of this is matched closely by my lack of ability to illustrate my thinking. Apologies. But thanks to anyone for their help.
Dan
edit: Meant to write ‘Wouldn’t the radius of the ‘camber’ be the same regardless of which side was on the wood.’
Christopher Schwarz did a blog or an article that explained this perfectly. He used a coin on its edge to show why the bevel up is more difficult to camber. I can’t find it right now, but maybe someone else has a link.
Thanks Ray. I couldn’t find the exact article, but was able to wrap my head around it finally. Why oh why do I obsess about these things when I should just be making stuff?? This post here got me most of the way home. http://www.rpwoodwork.com/blog/2009/05/21/how-much-camber-should-be-in-plane-irons/
Have you tried one with a toothing iron?
Plane any which way you like with no tear out.
Bloody brilliant.
After getting the tearout under control on my bailey smoothers using your youtube guide (also a year of experimenting beforehand, but it was your video that allowed me to get consistent results) I have been wondering… what’s the point of a bevel up plane when a good ole stanley does it without flaw?
I don’t own one, never tried one. I only buy used tools and so far I’ve never come across a used bevel up plane. Based on this blog post it works as a jack for difficult grains (though how much better than a properly set up stanley I dunno?) and for end grain planing.
“The bevel up plane seems to be in it’s own realm when it comes to iron thickness. They are monstrous.
This alone makes sharpening a chore. Add in a camber and that chore becomes an overwhelming job.
Cambers on a bevel up plane iron are just awkward. They need to be more exaggerated, so there’s just a huge amount of material removal to deal with.”
You need to think outside the box. Cambering a BU plane with a 62 degree cutting angle (i.e. 50 degree bevel) is child’s play when you use the appropriate technique!
Rule #1 – forget creating a 50 degree bevel and cambering that. It is impossible.
Rule #2 – only ever use blades with a 25 degree primary bevel. Then use a honing guide to create a 50 degree micro secondary bevel, and camber that. Easy peasy now … so much less steel to remove.
I devised this method in 2007: http://www.inthewoodshop.com/WoodworkTechniques/TheSecretToCamberinBUPlaneBlades.html
Regards from Perth
Derek
Has anyone ever tried to use the toothed blades for rough planing instead of the conventional cambered irons? There doesn’t seem to be much information about the toothed blades and Veritas has 3 different versions for multiple plane sizes. I’m mostly interested in the Veritas BU jack plane since I own that one.
Hi Christophero,
I’m also intrigued on this, so you may have provoked me in to a bit of experimentation. It’s not something I’ve used for prepping, more so for veneer laying (which I hate by the way).
If you have a Veritas plane, you want the coarsest of the three toothed planes for flattening boards. The medium and fine are intended more for veneer work.
I work at Lee Valley and teach a little class on preparing lumber with hand tools, so I’ve had the opportunity to use the toothed blades a fair amount. Compared to a cambered iron in a conventional bevel-down plane, they have their pros and cons.
Toothed blades remove material more slowly. They also produce messier shavings, which can get clogged in the mouth of the plane, or in the grooves on the back of the iron. As you might expect, this is more of a problem in resinous softwoods (e.g. spruce and pine) than in hardwoods. If you normally protect your blades with oil, switch to wax for toothed irons; that seems to cut down on the clogging somewhat.
On the other hand, toothed blades never create any significant tearout, even when taking a heavy cut. Each little shaving is just too narrow to lever out the fibres in front of it. Very handy when prepping difficult woods. They’re easy and fast to sharpen: no camber required, and they’re only half as wide as they look! They also leave a very distinctive pattern on the board, so it’s easy to gauge your progress when you switch to a regular blade (and perhaps a longer plane) for final flattening.
Personally, I use a cambered iron in a bevel-down plane whenever I can, but I’m very grateful for my toothed blade and bevel-up jack whenever I work with figured maple, ribbon-stripe mahogany, or even really knotty pine.
Hi Dan,
Thank you ever so much for taking the time for such a detailed explanation.
I’ll get one of the coarse ones on order. I recently just planed up this sod of a coffee table top, and I imagine it would have really come in to its own there.
The no camber sounds interesting, I’m looking forward to try it.
Cheers.
My pleasure! I’ve learned so much from your blogs and videos; it’s nice to be able to contribute something.
Once you’ve had a chance to use the toothed blade for a while, please let us know what you think. I’m very curious about if/when/how experienced hand-tool woodworkers use these blades.
Thanks Dan, I most definitely will.