
When owt gets born there’s blood, sweat and faecal matter.
That’s just a fact.
Giving birth to a workbench is the same.
It’s been a while since I’ve built a bench and I have to say I’ve been twitching for quite some time to do one. Building this hasn’t scratched that itch, actually this has made the itch worse….

My Rough French Bench
This workbench is for myself so that means that it’s had to be knocked up out of bits and bobs that have been kicking around the workshop for years. Sadly I don’t have the luxury of a fancy hardwood bench.
The top ended up being made from some old joists that came from one of our old barn roofs. The legs are some left over redwood, and the rails are a mismatch of pine and poplar.
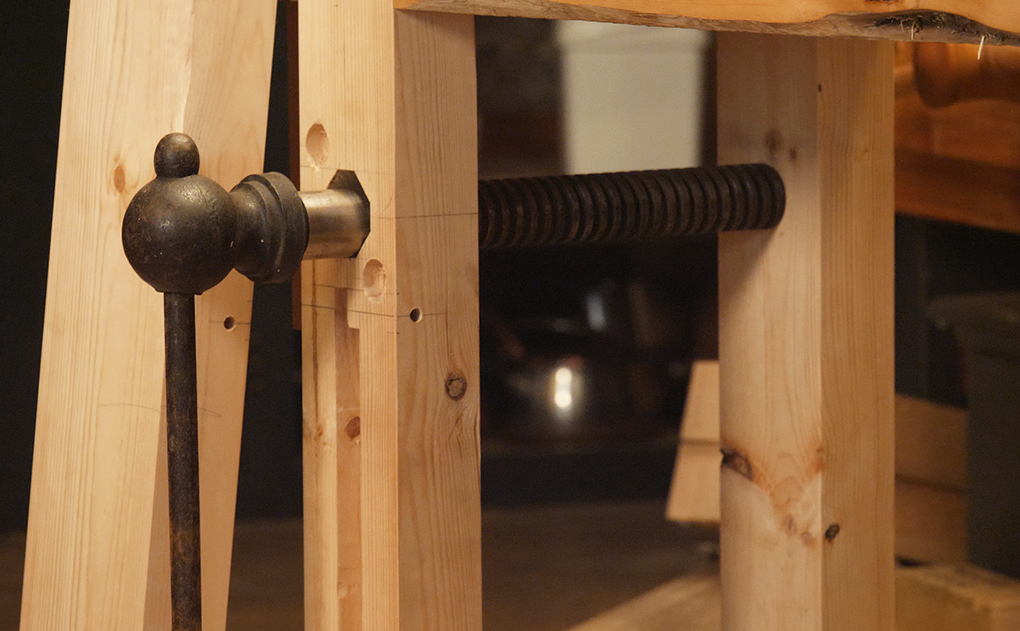
And of course the vice is that big old beauty that Arnold gave me, so it’s definitely my bench.

I’ve built it only six foot long, and it’s very narrow, under 19 inch I think.
I really like the size, and next to the big thing behind it, it looks tiny.
I choose to go this small as I want to film at it, and I find a shorter workbench looks better on camera. Plus it’s more realistic to what most people have.
Putting It To Use
I’ve got about a day left to finish up on it, and I have to say I’m feeling really excited to put it to use. It’s been a good few years now since I’ve used a bench in this style.
I’ll talk about some of the main differences in use between this French style workbench and my usual English one shortly.
There are a few, and they’re well worth thinking about before you decide which to build.
Ow, and we’ve filmed the build. It should be ready to pre-order next week.


We’ve got plenty more stuff on here about workbenches if you’re planning a build… here’s a couple more articles:
– Why Your Workbench Needs One Vice (Or Less)
– The Best Wood For Your Workbench Build
![Simple Work Holding For Ploughing Grooves [Without a Tail Vice]](https://www.theenglishwoodworker.com/wp-content/uploads/2022/07/workholding-without-tail-vice-copy.jpg)

![Gluing Up A Workbench Leg [VIDEO]](https://www.theenglishwoodworker.com/wp-content/uploads/2022/06/gluing-up-a-workbench-leg-video.jpg)

I thought they would be too small to be useful, you can see these in almost every French farm yard, just standing there waiting to be useful, I suppose they are a early equivalent to the workmate, and certainly much better than making things on the floor ! this will be an interesting project.
Now, wouldn’t that bench just look really good, I mean like the dog’s bouncers, with a yellow high-viz vest hanging on the vice handle.
It looks like a good project.
Will there be a video series? Soon? Say yes. Please?
Too long now without talkies and a few rants!
Nothing much to look forward to each week.
I’m in cold-turkey still!
Richard mentions in the post that the video can be pre-ordered next week 🙂
Yay !!!
I am always twitching to make another Workbench.
*prepares dosh to throw at Richard and Helen for the build videos*
Richard, PLANS PLEASE! SOON! That as a cry for immediacy. I have been looking for this bench for my basement and it will be helpful. I want to tackle the bench build around May 20. Any chance for drawings if not the video. I was planning on starting your English bench but it is too wide and too long for my workspace. The French bench looks like a better solution than trying to scale the English bench down.
Thank you for considering my plea. This is very exciting.
Ned
Hey Ned,
I built the English bench, scaled down to 5’ x 2’, works perfectly for me now but there are some gotchas, let me know if you have questions though. I am looking at this one though for a friends small shop, the narowness is nice.
I made a 4 1/2 by 2′ one in my living room. I found it tricky balancing space for a metal vise with holdfast holes, but it worked out well enough. The whole thing is a little too light, it moves around too easily. But it’s a living room, so I had to keep it as small as possible.
I particularly appreciated how the english one gave a structure to continue building itself with.
Thank you Tim. I was considering a Moxon Vise instead as a way of saving space. That is one thing in favor of the French build. I do have 5’ to 5.5’ available and that can aide stability. Another consideration is that I have an approximately 3’x3’ space that will be mid-bench where I will tie in an extension for tools etc. That will add stability
I suppose you could have a shelf underneath and stack up weight on that also. My bench is 5′ and moves around a fair bit but I don’t mind so much. Before I had it I did so much work on a kitchen counter or on a floor that it pales in comparison.
Not sure what dimension wood Michael used, but I used 8/4 rough alder, and left it rough except where it needed to be smooth.(Richard shows this in the videos). Leaving it this max thickness as much as possible I am sure adds to the heft. Especially over using 2x construction material, i have near 1/2” more thickness all around. I also added the planing stop more for added weight than strength. But mine doesn’t move around. Even on my epoxy-finish garage floor, even while flattening the top with a big transitional plane.
Thank you Steve. I will pick one or the other when the 20th rolls around. The date exists because I am waiting until the academic year ends before starting. It is likely to be my “recovery” project. If I go the English bench route tips on scaling it down will be appreciated. In fact anything that you think I should know that will inform the decision is welcome.
One question to start. How tall did you make the scaled down bench?
Thank you …
There is an extra episode in the English Workbench series on sizing your bench, Moxon vises, etc.. During the build, he goes through calculating the height and width of the different parts based on your materials. The beginning of episode also talks about options for the top.
For my 7-ish foot long by 22-ish inch wide bench (which I hope to complete in May), I did not use the dimensions on the plans. Instead, I decided how long I wanted it, how tall, and that I wanted a 2 plank top with a space for a flip stop down the middle.
Then I followed along with the videos and calculated things based on those rough dimensions. Oh, and the Get Sharp series was vital, as I am new to hand tools.
Hope this helps
I made mine 32.5”. But I wish it was taller. After doing some more research I am going to add some screw on extensions. I still have scraps i used for the 4×4 legs so am goimg to cut 5.5” pieces, and add some thick hanger bolts, then add some matching threaded inserts into the bottom of the legs. Then I can make it 38” for most stuff.
I built a version of Rochard’s English bench too. Five ft long, 23 inches wide. No vice. Using dowel bench dogs and holdfasts. Going to build a Moxon vice. At the moment that’s all I need.
Cheers
Byron and Gary, Thank you both. I watched the last video in Richard’s English bench series and also read a related blog post he put up on sizing. All were helpful and explained height. How to adjust the dimensions also became clearer. One thing that Richard did in an early video in the series was to make up a dummy of the complicated leg–the one that receives the planing brace. I think that will help me to better visualize the dimensions. He also made it clear to think about how to place the dog holes on the apron. I will still wait until late May to figure out which bench to build.
Ned
Hello,
I’m french and can you explain what a french workbench is….a workbench is a workbench, is there anything special in a ” french one” ?
Regards from Paris….crying for our cathedral
Hello,
Andrè Roubo in his 18th century masterpiece “L’Art Du Menuisier” describes a style of workbench construction that has become to be known as the “french workbench.”
The English style workbench is also called a Nicholson workbench after designs in Peter Nicholson’s 19th century “The Mechanic’s Companion.”
I am sure someone will correct any fine details i have missed.
Hello,
thank you, I know Roubo I just didn’t know that his bench was know as the french one because here we call it the “Roubo style workbench”.In fact there’s many different designs from him due too mass production necessity .
Regards
I think the French bench is also better at football :P.
Wouldn’t it be really something to be able to find enough usable salvaged wood from the cathedral to build a truly French workbench.
I think that would be a crime personally. A workbench is for work and that oak is so old.
I think a 19 inch width is just about the max that anyone can plane comfortably across . The size is not only realistic for most people but PHYSICALLY realistic . I mean what good is a 30 inch wide bench really?
I need another workbench build video, like I need another hole in my head. …you said pre-order opens next week, right?
I’ll doubtless end up watching this – like many others I imagine….
I’m interested by the fact it looks a good couple of inches higher than the English bench in the background, along with the mortice in the vice leg for something ‘scissor-like’ I’m guessing, plus the holes for pinning it….??.
perhaps it is designed for joinery, that can explain the extra hight
Richard,
The bench looks bewdiful !
In answer to comments re the size etc, it seems it needs to meet the individual needs of the worker and the size of the shop. Also height may be dictated by age and physical capacity. for example older people or with some incapacity may want it a little higher so as to avoid back problems whilst pursuing their passion for wood working.
The bench is an expression of that passion and is the centre of the hand wood working shop.
All the very best to you Richard and Helen from your mate from Down Under. Err yes from down there !
Brian
This looks to me like a great summertime project, Richard.
One of the things about a workbench, for some of us anyway, is that we only have the one. So, once again for some of us (i.e. me), there won’t be an existing bench on which to work when we build this one. I expect the video is already done, and if that’s the case I’d be made up if you could add some info about how to go about the build using scratch workshop supports – trestles, an old door, etc.
Also, will you give some recommendations about making the most of short lengths of reclaimedstructural timber using scarf joints or whatever?
Martyn
Martyn,
The english workbench build was done on trestles without the use of an existing bench. Richard had a bench in the background but did not use it. You may want to check that series out if you haven’t done so already. Also, this latest series will probably be done on trestles as well. I think there was a blog post a while back that Richard primarily uses trestles in his workbench builds.
Can’t wait for this new series to be posted.
Chris
Chris, that’s good news. Thanks.
As for checking out the previous bench series, if it is one of Richard and Helen’s premium series, then sadly I can’t afford it. As a pensioner, I can’t justify spending money on something I’m not going to use, and whereas I would definitely use a 6ft Roubo bench (and will therefore happily pay for the series when it arrives), I don’t have room for the bigger bench. A shame, but a fact of life.
Martyn,
Do you have sawhorses? Even cheap ones would work as a temporary base. In the english bench series Richard shows great tips on using the plank material as a makeshift bench to use to build it, and making a wedge out of scrap to make one plank higher than the rest to use as a planing stop or saw stop etc. I’m guessing he’ll do similar.
I’d definitely recommend building some saw trestles out of some cheap construction lumber before building your first workbench. This gives you a great opportunity to test out the workbench height that you have in mind. You’ll quickly find out if you want to make the workbench that same height or +/- a few inches.
Steve and Chris. Yes, sawhorses are a good idea. Thank you. And they’re always useful in the workshop anyway. Somewhere I have a set of plans for these; I should make a couple up. I think we will have to wait for the video to learn how Richard has approached the construction – I’m surprised he hasn’t commented here, unless he’s got something up his sleeve!
I built the large bench with some minor modifications last year but do need a smaller bench from time to time. That means = I’m in!
My first (and only) REAL workbench is just about that size – a bit more than 6 ft long by 18″ wide. Top is 3 layers of 3/4″ plywood glued together. 4×4 legs with 2×6 stretchers inset into legs at bottom. Legs inset into bottom of top and secured to top with two 3/4″ dowels in each leg driven through top and into ends of legs. Shelf on the bottom which I keep loaded with tools and such. It does NOT move around (weigh’s maybe 200+ lbs). Plywood too bloody soft but ok. Kept on pushing stuff off the top at the back so I added a 6″ shelf to along backside (with 2″ high edges). I do not find the size too small. Would love to build another bench so looking forward to your video!
A question:
what is the advantage of using drawboring pins compared to the more common tusk tenon joint? As workbenchs often are placed in outhouses with large variation in temperature and moisture it would seem an advantage to have the possibility to straighten up the tension now and then when climate has loosened all the joints.