
Bevel up planes have thick irons. If it’s made of softer type steel – o1 and such, then you can still sharpen with a cheap oil stone.
You can sharpen owt on the humble old oil stone, but that doesn’t mean that you’d want to.
In our sharpening trilogy, I go on quite a bit about how your choice of tool will tell you what kind of sharpening method and set up you’ll need. I’m very firm on how effective oil stones are, but also that this is only the case when you’re dealing with O1 (or the softer type) steels and preferably blades which are thin.
So what if you want to tart up the edge on a great big thick iron made of O1?
Is an oil stone up to it?
This is a question we get asked a lot, and in particular with regards to those extra thick irons that you find in a bevel up plane.
The simple answer is yes. This is perfectly possible.

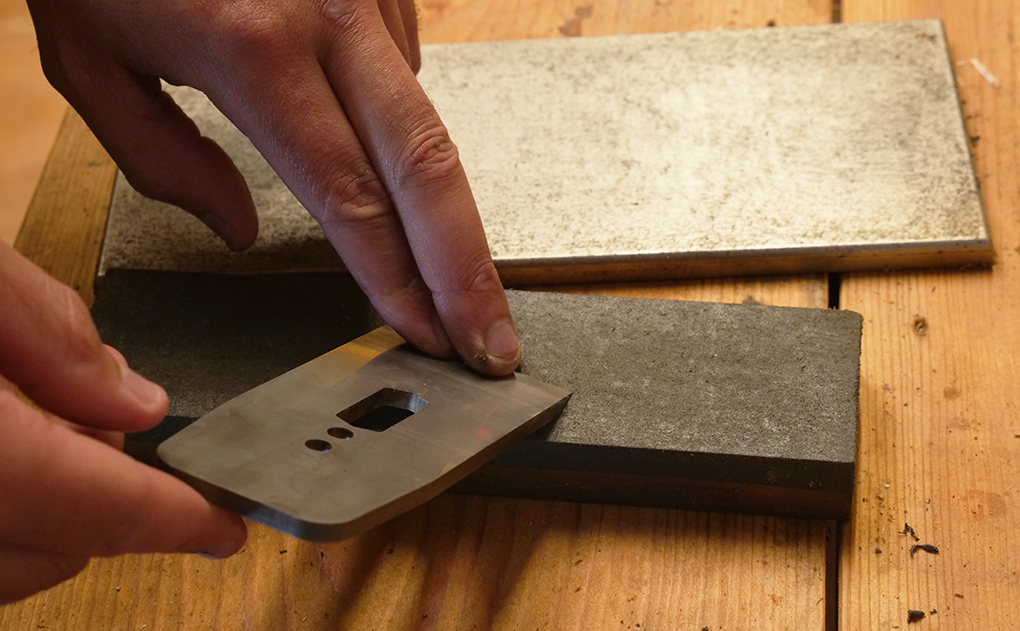
Thick irons such as the one on the left require a different approach to sharpening than the one I use everyday in my Stanley (right). If the thick iron is made of softer steel (O1 or similar) then it can still be tackled at an oil stone – see the method below.
But the real trick would be in the discipline. You would have to make sure that the edge doesn’t run away with you. With a strict routine I actually don’t believe that sharpening that thick iron would be all that troublesome.
However, if you do push a few sloppy sharpens and ignore your protocol you could quickly find yourself in a spot of bother.
This is all because accurate sharpening requires the removal of such a small amount of material.
Use an accurate and disciplined routine and you’ll be sharp in no time.
But if you let your edge get in to a state, or cock things up you’ll be looking at a lot of steel to remove to reestablish. At that point it’s not something you’d want to tackle at the oil stone.
Sharpening Thick O1 on Oil Stones – The Method
If you’d like to sharpen a thick O1 iron at an oil stone then you’ll want to start with a flattish stone and a factory new or reground iron.
The process itself will be the same for every sharpen, no exception.
Registering the primary bevel
The Primary Bevel
Due to the thickness of the iron, the primary bevel will register on the stone and act as its own guide.
Press the bevel down on the stone, skewing it so that it fits fully on the surface. Rub it back and forth with care until you can see its evenly abraded on the entire surface of the primary bevel.

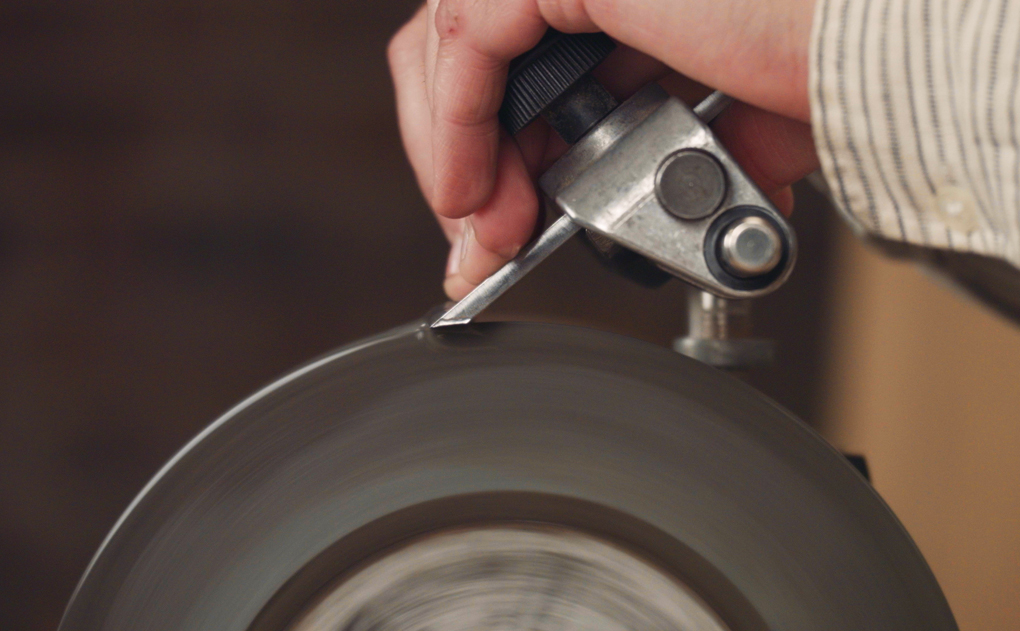
Setting the guide for the secondary bevel
The Secondary Bevel
For the secondary bevel you’ll want to use a guide.
Where I’d always free hand with a thin iron, in this scenario we’re depending on things to be dead precise. The guide will save you time here by ensuring you can remove as little material as possible.
This accuracy is even more important with the bevel up plane as the cut will respond to the slightest change in bevel angle.

Aim to remove as little material as possible while sharpening the secondary bevel

Create the small secondary bevel on the fine side of the stone.
Now move to the finer side of the stone.
Rub about as little as possible, until you get the slightest burr on the back.
If you need a little camber then this is the time to do it.

Removing the burr

Strop to finish
Knock your burr off and have a light strop.
So there’s nowt special there.
The important part though is when you resharpen, without question you need to re-establish the primary bevel every time. Then add in the tinniest of secondary bevel. If the secondary bevel has a camber then you don’t need to fully remove that with the primary.

Remember there’s a million ways to sharpen, and I use many depending on the tooling and situation at the time.
This is just one very specific example that might get you out the shite if you have limited kit.
Sharpening efficiently is a discipline. And it’s vital to match your methods to your steel types and to your stones.
Read up more about sharpening:
- The Simple, Most Cost Effective Sharpening Set Up
- Understanding Iron Cambers
- Sharpening Narrow Chisels – The Problem & Solution
For a complete guide to sharpening your edge tools, including the set up for harder steels, methods, routines, angles, cambers and all the other scientific maths, have a browse of our ‘Get Sharp’ video series.
![How I Sharpen My Chisels. [Video]](https://www.theenglishwoodworker.com/wp-content/uploads/2025/08/How-I-sharpen-my-chisels-400x250.jpg)
![How do I Sharpen a Router Plane? [Q & A Video]](https://www.theenglishwoodworker.com/wp-content/uploads/2022/11/how-to-sharpen-a-router-plane-video.jpg)

Richard, can you talk some time about your approach to flattening backs on older plane irons? I’d like to follow your advice and get a minimalist hand tool kit up and running quickly, but this problem has literally taken over all of my (evening/weekend) shop time for weeks! It’s very disheartening, and I’m sure I’m not alone in this.
No you’re not alone and it takes AGES even with a diamond stone.
For plane irons you can “cheat” and use the Charlesworth ruler trick.
For chisels you have no choice but can limit work by:
*Work with the coarsest fast cutting stone you can first – I’d like to try 180 diamond stone
*Work only in the last 1cm of blade near the cutting edge – limits work load but does give a smaller reference surface
*Grind short the blade if that’s the low area – you lose maybe 3mm of blade but you can afford this from a chisel (which will likely outlive you) to save hours of your life
*Make sure your higher grit stones (especially water stones) are flat so as no to undo all you hard work
*Put a podcast/video on (I was listening to Richard’s Get Sharp Q&A) or learn to meditate
Oh and wear gloves – that black steel takes a good week to wash out if you have a job where oily-looking hands are a problem!
Well that much you probably also worked out during an hour on the stones but if not hope it helps.
It only needs to be done once! This job above all else has incentivised me to limit my chisel collection
I second using the most course stone you can get your hands on. I’m going to pick up a super course ezelap at some stage just for this type of work and getting rid of bad nicks after a fall on concrete or hitting a nail.
I will suggest an Atoma diamond “stone”, the coarsest that they make. I’ve tried a lot of coarse regular and diamond stones, but nothing cut to my satisfaction until I got an Atoma. That thing cuts FAST!
Hi from germany! I had a question about lapping the backs of plane irons. Currently i want to give a bunch of planes to a former colleague. We made dormer windows using machinery only. We both left the shop. I made it for three month, she stood a year before being fired. I want to hand thones planes ready to use. One roughing plane, a wooden rabbet, a wooden jack, converted to a short try plane, a coffin smoother and a no. 4 iron johnny. Nlw it takes ages to flatten all those irons, how did the old ones do? If they did a t all, then how did they get the irons keen without flattened back? Thanks!
I was originally taught to sharpen on with oil. But after reading from a lot of folks who either never used oil or switched from oil to water, I’ve made the switch myself, and noticed a huge benefit in that water doesn’t clog your sharpening surface. It washes right out, whereas with oil it just clogs and is difficult to remove. I also remembered when I worked in a piano factory watching the bridge guy (the guy that notched bridges all day with a chisel) keeping all his stones submerged in a bucket of water. I borrowed his stones a few times to sharpen my own chisel and It was just overall quicker and easier to clean up.
To each his own, just my own opinion.
Looking forward to reading up on building one of your workbenches. This blog was a nice find to add to my collection.
I noticed in the photo that the thick iron is not O-1 but a Veritas PMV-11 alloy. Does the oilstone sharpen that easily?