Seeing all the variety of work that Richard does I had almost certainly overlooked the technicalities of simply sawing to a line. I’ve been pottering now and then as mentioned in my post earlier this year and I’d finally found the time this past weekend and persuaded Richard to put a bit of thought in to teaching me something properly.
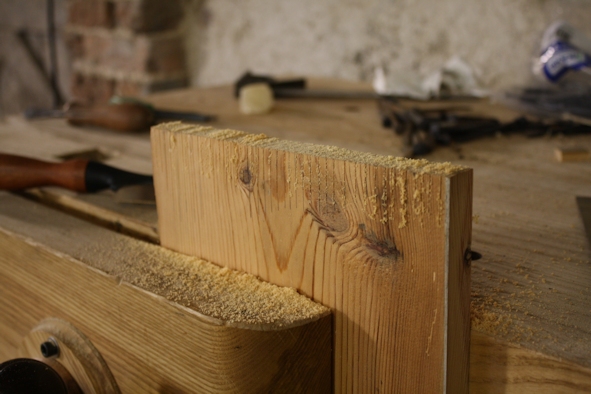
I have several pieces in mind which I’d like to build but I’m getting way ahead of myself. Richard’s suggestion was to practice sawing, and more specifically ripping a short way down thin stock in practice for joinery. There was a wide board of pine clamped up in the vice with half of the face littered squarely across the top and down the face with lines.
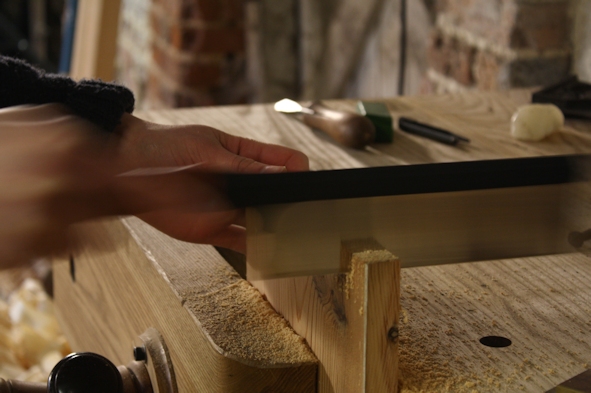 I was told I’d need to cut at least 200 of these lines. I couldn’t tell if this was an exaggeration or if Richard was being completely serious (that happens often). I thought perhaps 20 ought to do it but I didn’t say anything.
Whenever attempting to saw in the past my thoughts have been nothing more than to grab hold of saw and push. This is always a clatter getting started and a clatter to make any progress and then when it binds my reaction is to simply push harder.
The first advice when starting line number one was ‘Relax’. Hmmm.. how could that help? But there was an immediate improvement. In fact once I took the weight off the saw I felt like a master compared to my previous jutters. I wasn’t, the line shot away at an angle but did cut so much smoother.
I focused on the next session of lines and had my attention drawn down to my feet. I couldn’t really see how the way the I was standing could have a lot to do with anything, but once again I was impressed with the improvement made, this time from simply giving some thought to my stance and balance.
After my lesson in body position I began to feel that there was an awful lot to be thinking about. I was now on my 3rd row of cuts and picking up the pace – no more trouble getting started, relaxing my grip, cutting fluently (I did relapse several times though.)
The problem now was the angle. Every cut felt smooth but I was repetitively cutting out of square towards my body. I tried cutting out of square the opposite way and accidentally got very close to the desired result.
I began to realise that it wasn’t so much about looking at the line to follow but remembering how it feels to hold the saw when it’s cutting square.
Perhaps that was why I still had a further hundred and fifty to go…
 After a few days break I popped back to the workshop today and had another try. I was surprised to find that I could saw quickly right away – at least something must have sunk in! I was far from perfect but got fairly close to the lines each time… well, it was definitely an improvement on before.
This feels like a very meagre achievement to be sharing here but perhaps I’ll be able to move on to something a little more constructive next time?!
More Posts From My Beginner’s Journey
[module type=e category=”woodworking-for-beginners” amount=”8″ ]
![Pt 2: Reamers & Tenon Cutters: Use & Applications [Shop bought vs Homemade]](https://www.theenglishwoodworker.com/wp-content/uploads/2026/06/355735B8-6EB7-48E7-8135-A45EC52D5F2F-400x250.jpeg)
![Pt 1: Understanding Chair Joinery: Tapered Round Joints | [ FREE 6 Part Video Course]](https://www.theenglishwoodworker.com/wp-content/uploads/2026/06/D4FD5406-5390-49FC-B939-255EFF4F845C-400x250.jpeg)
![Remove Saw Set = Improve Your Joinery [Video]](https://www.theenglishwoodworker.com/wp-content/uploads/2026/01/9D16FCB8-2406-4C54-93C9-550C75097009-400x250.jpeg)

I still do that for a warm up, then I cut it off and thats my cross cut practice. Nice post 😉
Helen, there is nothing “meagre” about mastering a saw as there is nothing more difficult in woodworking than developing the ability to cut to the line consistently.
Dear Helen,
I feel that you are a kindred soul. I too am trying to learn the basic practice of woodworking with a honest ambition to do do as good as I possibly can. Please share more of your learning experience and your thoughts about it.
With best regards, Lars
A meager achievement? Not on your life. Stand proud, and also be thankful you have a (good) teacher. Every single cut I make to this day is a learning “procedure” -for lack of a better word. I approach it as if I’m teaching someone else how to do it so I concentrate better with each stroke. Silly perhaps, but true.
It could also be said that I “cheat” in that I use Japanese saws mostly (pull stroke) but knowing what I know from those has helped me to understand the whole process better. Give one a try. I think you too may get a better “key” to grasping this necessity.
Bravo! We (I!) need more of this. Rote practice of the simple things will give you the capability to do much more complicated work in the future.
Here are some things that helped me, although I’m still a novice:
1. The saw cuts on the push stroke, and this affects how you start. If you put the saw down at its heel or mid-blade to start and then draw towards you as the first movement, then the saw is bouncing off the points of the teeth and this frequently makes little divots in the wood. When you then go to do the very first push, the teeth go into those divots and you feel a jolting, jarring start, maybe even just feeling stuck. So, I was taught to start the cut on a push. Like you said, unweight the saw, forget about sawing, and just gently rub the saw with short, unweighted strokes. To me, I feel a kind of “opening up” that occurs after a few of these gentle rubs done at the very front of the saw and a sense that the blade is ready to settle in to a “real” cut, at which point I give a definite and defining push. I feel the saw bite in and register into a cut at this point, which is why I call it “defining,” and then can keep cutting from there. At that point, I start to pay attention to my vertical layout lines (while rubbing, I’m paying attention to my horizontal line). Go get a piece of pine and draw the saw towards yourself for the full length of the blade as a start and you’ll probably see the divots and will be convinced not to do this. It is self defeating…you do it a little, so the push is hard and sticks, so you draw again to get ready for another push and the divots get even bigger, etc. Try it on end grain and long grain.
2. Starting is helped by filing the end of the saw with a less aggressive tooth, then having the rest of the saw filed as aggressively as you like for the job.
3. I like to take an angle bevel and lay out some lines that are not square to either face. They are just fun to cut! You’ll find that, if you move your head around before cutting, your layout line looks like a “V” or seagull across the edge of the work, but at one position of your head, the “V” straightens out to a line. Try cutting with your body/head at that location and compare what you get with what happens if you just eye it with your body where’d you have been had you not thought about it. I think Craig Vandall Stevens mentioned this someplace, and I found it interesting.
4. If you’re like me, keep the plane handy after rips. 🙂
I found I got better results when I started “mentally” pointing my index finger in the direction I wanted to cut. When learning to drive a car, It’s easier to focus on a point on the horizon an steer towards that, than it is to concentrate on keeping the car between the lines on either side of you and be constantly over-correcting.
It’s rather like learning to ride a bike or to swim – it seems so difficult and you can’t see what you are doing wrong. But analyse carefully how Richard does it and keep practicing, then one day all the elements will come together and you’ll wonder what the problem was.
I notice that when the saw is cutting well it sings. When not it groans with a nasty hard sound. Planes also sing in a similar way but it is more like a swish of silk when going well and a stuttering groan when not. Glad to see you using an English style back saw but could not see if it was a first class English saw made by Finn?
Wonderful post, Helen. Sounds like you have a pretty good teacher there, too. 😉
I’m working on trying to figure out the best way to teach my little one various things; I could use some help on what might be better teaching methods than others. Did you first observe and then emulate? Or did you receive verbal instruction with demonstration? Or… what?
I suppose I’ve observed an awful lot prior to picking up any tools, but then I have been unnaturally overexposed to woodworking over the years! I feel that watching someone work first is a great way to get some idea of what it’s all about and then for me, trying to copy without any instruction seems to be a good next step. Making some attempts without guidance is a good way to learn the pitfalls and whilst you don’t want to get in to any bad habits I find that doing it wrong first helps to make sense of the instruction when it comes – you can clearly notice the improvements and it helps it stick in your mind.
After a few attempts on my own Richard observed and then pointed out why I was having difficulties, and explained how to correct it.
Best of luck with your teaching!
For those that might read this in the future (I know this reply is 6 years late by now):
Paul Sellers wrote a blog post about his apprenticeship and how he was told to stand by the side of his mentor, watching him work. He was not allowed to pick up a tool before he had stood there for some time.
Watching how it is supposed to be done… no, wait! Watching how it COULD BE done, is a great start. You know roughly how to do it, at least one way to do it. Sprinkle on a bit of theory, and off you go. Then correct and adjust.
I think this is a good way for most people; it enables each individual to find what will work for them. It does nobody any good to tell the blind not to look. Or how to work right-handed for a right-handed person (it is fairly obvious). It is how our kids learn: by emulating eachother.
I once bought a MIG welder. I had some aluminium I needed to weld (and who doesn’t need a welder?), so I got on Youtube and started research. I saw a number of videos showing how to do it and what to watch out for. I then read about aluminium welding and why that is regarded as difficult (it really isn’t, although it is challenging). When I “blew out” a big hole in the two plates I tried to join, I knew exactly what I did wrong – but I got the experience on where the line I should not cross was located. Afterwards, the angle grinder made me into the welder I am not, so it’s all good.
I could’ve read a library and not had the same success. Watching a video where I saw the puddle of melted metal, the electric arch and how the wire melted and the drops jumped into the hellish bath – it made me understand what was going on in an instant.
Teach others by showing them, then let them try. Then iron out increasingly smaller wrinkles. Letting the information stew for a few days is never a bad thing. The brain needs to do its thing. Math is, in my experience, the same type of beast. The information needs to mature, to “sink in”.
Anyway, this is my personal opinion and experience. It might not suit you, but I think it is sound advice none the less. Even though I reply to the kilted woodworker 6 years late. 🙂
The ability to saw to a line is so worth acquiring! It’ll save hours of work truing up later. If you think of a dovetail with, say, 3 tails, that’s 14 saw-cut surfaces and the idea of laboriously paring all those back with a chisel makes my eyes water! Invest the time to learn precision sawing and enjoy the benefits for a lifetime!
In his now ancient book The Writer’s Craft, Frederick Birmingham’s first instruction was to “Write Away”. My woodwork teacher of some 55 years ago said much the same to our young class instructing us to first just saw up lengths of his unwanted spare pieces of softwood with pencilled lines on them and, for those who wanted it, he would to take us on the journey to the high temple of the straight and square cut line. For me, he did and I am forever grateful to the quiet and patient Mr. McGrail. Following my school days my career took me on a very different path to the one he wanted of me and I just became another occasional hobbyist and although these days I tend to switch on my machine to do the cutting (horror!), I can still place my right hand on one of my saws and keep it on the straight and narrow. So “saw away” Helen and I know you will arrive in the same place. Richard is right.
I smiled when I read this – memories of a taskmaster in the woodwork class at school when I was about seven! It was painful at the time, but I’m glad I was taught. Richard sounds far kinder, and I’m delighted you’re making progress.
You’re so right that one learns to do this well, and that practice remains essential. My woodworking is usually in sporadic bursts of activity–other things get in the way–and I really notice how bad I am when I get back to it after a long break.
But it’s a perilously subtle skill, too. I recently bought some Japanese saws, taking advantage of a special offer. The first time I used them I was amazed by the quality of cut – better looking crosscut results than I can manage after sanding!
The trouble is ripping. You get a brilliant, narrow, clean kerf, ho yuss! But I can’t yet steer the jolly thing! Anything I try in twisting grain ends up crooked. The flexible blade goes where it will! And of course, because I’m pulling, not pushing, normal corrections don’t work.
So I’m on a new learning curve, all over again. The only positive is that, because Japanese saws are so much thinner (and sharper, at least to start with), it’s far less effort than normal.
I’m going to have to hurry up getting that woodburner iinstalled though – the scrap bin is getting full again 🙁
I’m a self-employed handyman and my work has often involved a certain amount of basic woodworking. I’ve always had an interest in traditional skills, and just recently I’ve started to get into the more technical stuff (currently building a bespoke garden gate with mortise and tenon joints, bit brave for a first project using these joints).
I have to admit that my sawing (and chiselling) have much room for improvement. They say a bad workman blames his tools, but I’m currently having to do my best with what I have, which is an uncovered back yard (no good in the rain), a Black & Decker workmate for a bench, a 22″ Stanley hard-point hand saw and set of Irwin Marples bevel edge chisels. I also have a few marking and measuring tools, but mostly cheap stuff picked up from a well known DIY store.
Any guidance in both tool selection and proper technique would be much appreciated.
Andrew.
Hey Helen (and Ed in the comments),
thanks for sharing. Very helpful to me and where I stand today.
I am especially struggling with long cuts that yield to my body 😉
I’ve been working hard to improve my saw techniques recently. There’s a lot of literature about how the saw cuts and how to hold it but I think its often overlooked that overall body position is critical for getting good results with the saw. In particular, I believe how you position your feet helps a great deal.
It wasn’t until I came across a blog position, somewhere on the interwebs, explaining how drawings of craftsmen from times gone by always show the foot opposite to the cutting hand (i.e. left if you’re right handed, the other way around if not) forward and parallel with the cut with the other leg (i.e. right if you’re right handed, left if not) behind the worker, about shoulder width apart and turned so it is roughly perpendicular to the saw cut.
I’ve also seen a few posts here and there that suggest having a bend in the knees is beneficial but I personally find my sawing is better in a mostly straight legged stance. However, regardless, taking time to make sure I position my feet in this way, coupled with the mantra of “let the saw do the work, be gentle with it” seems to have improved my technique such that I can pick up the saw now and knock out cuts which are pretty square.
Keep up the practise!
Thanks Helen, I’ve been paddling around the edges of starting to learn some woodworking skills, largely so I can do a semi decent job on a bookcase and fitting out our truck. I had been ignoring the fact that my sawing is utterly rubbish. So…now I’ll go and practice like crazy before murdering the actual job.
Sawing is a real tough one, it sounds so easy right?, pick up a saw and have at it…
I picked up some great tips from Chris Schwartz via Robert Wearing’s ‘Essential Woodworker’ and the classes of sawing, but before that, there’s a great clip on Shannon Rodger’s site the Renaissance Woodworker, RWW191 ‘One step to better Handsawing’
Richard, Helen I hope you don’t mind me adding this , This clip really helped me bring a lot of the theory and talk around sawing bet practice to light… 🙂
Cheers
Steve,