…(and I also drink far too much tea!).
I’m not writing this post as a lecture or to try and educate you about tool wells, it’s more about me asking for your own views and experiences. For pretty much my whole life I’ve hated tool wells. I was born a tool well hater and yes, I do think hate is the right word here.
But of course we can all change, and when you build lots and lots of workbenches the topic tends to crop up from time to time with customers; I’ve heard a lot of support for them.
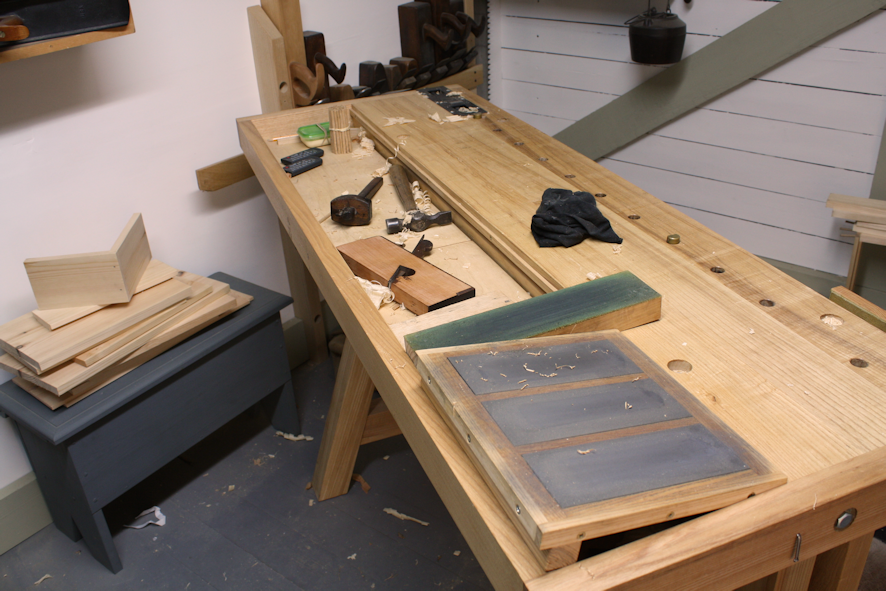
My arm wasn’t twisted though until I came to design Little John last year. I experimented working off what to me seemed like very short benches (5′ long) and I realised just how cluttered things became so quickly. On a longer bench I’m used to the luxury of using one end to keep all of my tools to hand but there just wasn’t going to be the same space and so we played around with the tool well. I’ve worked off this bench for a year now and at the moment we’re looking at providing an option for a full width top without tool well. This is when I realised how much I’d miss it!
My two main reason against the tool well were, one – it surely just gets filled up with crap and shavings. And two – you sacrifice the weight in your workbench.
These are still very big concerns for me and I think if your going for a tool well you definitely want to make sure the bottom can be emptied quickly. We use two short trays that can be lifted out easily so all the shavings can fall to the floor swiftly.
Working off Little John has completely changed my perception to the point where I would now strongly consider including a tool well in my next bench.
Something else we get asked for often is storage within the base of a workbench. I’m afraid this is something that I remain strongly against but I know this is personal. I’m sure it makes a lot of sense especially for saving space in the workshop and there’s no harm in adding extra weight there to hold your bench in place. But I’ve always struggled with the idea of being able to use your workbench fully with cupboard and drawers blocking the access for holdfasts and dogs.
I also have a bad memory of an old workbench which I started out with which had a lovely row of drawers along the top. They we’re nicely made if a bit beat up and stiff but were certainly very handy for storing everything out of sight but close to hand. There was more than one time when I stood pleased after spending a good while perfectly lining up and clamping a complicated face frame or such. I’d just need to grab a block plane to true things up but of course the block plane was in the drawer which was now blocked shut by the array of clamps… everything had to be removed.
A shelf is perfect bench storage for me. You can add to this all manner of boxes, tool chests and totes so that tools are close by and the space is all well used. I particularly like the idea of making some purpose build totes for specific jobs such as a vice fitting kit. I’d always have everything ready to carry the necessary tools over to the job; they would even have a flap down lid to keep the dust out should I ever get around to making them.
I do like the idea of built in storage in an assembly bench to keep all of the bulky glues and finishes out of sight. And a final thought is how useful the English style of workbench can be for its lack of bottom rail, this makes it the perfect area for wheeling under a tool chest or small extractor and it’s so easy to brush out all of the crud which finds it’s way under your bench.
Anyway if you happen to love workbench storage or hate tool wells then I’d love to hear your reasons why – no matter how obscure. Even when you feel stuck in your ways we can always be persuaded in a new direction, we’re constantly evolving and changing. Unless you’re my old man… he never changes.
So my name’s Richard and I’ve gotten over my hatred for tool wells!
We’ll be working late tonight in a bid to get our next video up and running tomorrow. We’re taking a closer look at cutting rebates with some really basic solutions that avoid the fillister plane used in Part One of the Wall Cupboard build.
![Simple Work Holding For Ploughing Grooves [Without a Tail Vice]](https://www.theenglishwoodworker.com/wp-content/uploads/2022/07/workholding-without-tail-vice-copy.jpg)
![Gluing Up A Workbench Leg [VIDEO]](https://www.theenglishwoodworker.com/wp-content/uploads/2022/06/gluing-up-a-workbench-leg-video.jpg)

I built a bench similar to Little John in size and design. I put a tool well on it for a couple of reasons. For me, “temporary” storage space, and other flat surfaces are at a premium in my spare bedroom “shop”. I used to have a folding table where tools would land while I was working on something (using a workmate). Planes would be set on the floor (carpet/canvas tarp), I’d use my saw bench to set things, and the list goes on a ways.
The dimensions of my bench are 4′ long, and 21″ wide, so having a place for tools to land while I used the rest of the bench was almost a requirement. I knew I was going to be setting things on my bench, and I’d much rather they have somewhere to be where it’d be harder to knock them off the bench, and where they could be mostly out of the way. I can set most of my planes in the tool well on their side and they’re out of the way enough for me to still face plane using my wagon vise. My primarily used square, pencil, marking knife, a brush, and notepad all live in one corner of the tool well on a pretty permanent basis, so they’re always close by.
My tool well bottom is made up of boards that are about 6″ wide each. This allows me to remove just one section if I needed to use a clamp to the underside of the bench.
Plus, I also like the aesthetic of a tool well more. It just appeals to me more than a massive bench top. Though I suppose I rarely do large panel work, so I don’t necessarily need that much space.
Nice post Richard. You have seen my bench, no well. Even when I’m working on a small project, I turn around, and magic half my bench is cluttered with tools. Now I hate a cluttered bench top, and I do keep putting the unused tools away, well for a little while, yeah magic again Ha they are back again.
Now if I had a well I know for sure they would get dumped in there, buried in shavings and god knows what else, then spent the next half hour looking for something .
I do try and work in a tidy manner I never win. How dose a quick half hour job, turn into a half day job with just about every tool you have on the bloody bench top.
Thanks for this one buddy, love em all 😉
I’ve never got on with tool wells. As well as getting filled with tools and shavings, unless they are very deep, the contents stick up above the surface of the bench top and often interfere with wide work pieces. My current bench does not have a tool well.
I prefer to keep my tools on the wall behind the bench where they are readily accessible or in banks of drawers nearby.
My bench wont have one as I have a work surface behind me to place tools. If I didn’t have that I would either have a removable tool well down the centre (aids in clamping) or something like the old draughtsman’s trolleys.
Hi Richard,
My old bench did have one and it was always cluttered with shavings and tools and difficult to clean out. Basically all German benches do have a tool well.
So I designed my new bench without a tool well and I’m still happy it doesn’t have one! Some tools are always on the bench, but the planes usually go straight back to the wall. Currently I’m building a tool chest and I plan to store my most of my tools in it. I’ll put it on wheels and will have it close to the bench so I can work out of it. We’ll see if it works out…
I really love your blog! It also helped me while designing and building my new bench. Thanks a lot for your work!
Nikolaus
I used to get annoyed when I would set a tool or some piece of hardware on my bench top only to see it roll off and drop to the floor. My bench wasn’t exactly level so round things would roll on it. I just did finish my shop redo and part of that was to get rid of that bench. Not so much because of the level issue, I could have blocked it up to level, but because it was too tall and too long, and it was just built wrong. I couldn’t hold anything on it and I couldn’t use a plane on it worth a hoot. I shamelessly copied some of the ideas from the Little John design and built a smaller shorter new bench with wood holding capabilities. I built the tool well too. I love it. If chips and shavings get down in it, no big deal. I can either dump it by removing the bottoms or just grab my air hose with the long nozzle and blow the stuff out. Takes a couple seconds either way. Mostly I love the fact that now when I lay a round item down on the bench top, if it rolls at all, it will roll to the well. I have built the bench so on the top there is a small amount of slope towards the well. Then should something like my pencil roll off into the well the well has that same slope and the pencil will roll towards the back of the well where I can see it. If the small slope wasn’t there, the pencil might be hidden by the front wall of the well. No more chisels hitting the floor. That is probably all clear as mud but hopefully you can visualize it. Anyway, I really like the bench style and really like the tool well. It is by far nicer to work on than my old bench. Only problem is I had to use 4×4 Douglas Fir lumber from the big box store. It is soft and wasn’t the best wood to use for a bench. It will dent real easy and get tore up fast I’m sure.
Mike
I’m against tool wells and the clutter they bring in general terms, plus I just like the full width top.
However, I’ve thought about a tool well is paired/integrated with a matching chest (business expansion opportunity!) 2-3 tills would come out of the chest at the beginning of the day given the tasks at hand and fit flush into the bench top with maybe a “blank” that could be a well or flip and be flush. This would allow you to bring out the planes, carving tools, glue-up stuff, mortise tools etc. as needed, and everything easily goes back in the chest or where it belongs when done. Sort of a systainer approach.
A simple flat surface…and tools hanging up and in drawers for the smaller stuff is all that is needed in a workshop.
Tool wells are just asking to be filled with junk and shavings and I am totally in agreement…are not something I would entertain!
How’s it going mate…how are the monster machines coming along?
Jimi
It’s good to hear from you Jimi. Did you recognise those benches in the photo in this post?
We may have have some very big news on the machine front soon but I’m going to hold off until we know for sure. I’ll be in touch with yourself and Douglas though as soon as we do.
Wells are great, just make an insert for when you need the service of the whole top. One really should have a separate low assembly table however for assembling anything bigger than drawers. Workbenches are for working parts and subcomponents. Assembly tables are where carcases get knocked together, etc.
If you’ve never accidentally pushed a valuable tool off the other side of a bench that has no well I applaud your ability not to work with a bit of frenzy. Putting each and every tool up just to keep the benchtop clear is a monumental time waster. Certain tools really should live their lives out in the well where they are close to hand – pencils and sharpener, folding rule, 10″ backsaw and bench hook, awl (never put one of these in your apron!), marking knife (ditto), a chisel or two (ditto again). Everything you need won’t fit in an apron and constantly opening and closing a drawer underneath the bench, as previously mentioned, wastes time.
I agree with your comments about keeping certain tools in the well all the time. I just replaced my 30-year-old bench that had no tool well with one that does. The well is deep enough (about 2-5/8″) to lay my Stanley #5-1/4 plane on its side without it protruding above the main top. The ends of the well have no lip so that shavings can be brushed straight over the edge. Or, more often, just blown off, big, bad wolf-style.
The bench is just under 6′ long, and I really like the tool well. I also fitted it with 6 drawers, a large cubby for shooting boards, etc., and still have about 6″ clearance above the floor, which is where I sweep shavings that will be cleaned out periodically–sometimes after several months, depending on how much bench work I do.
There you have it. Likewise, I am going to use my new bench for joinery and workholding purposes and a small assembly table for holding things as I glue them or knock them together as you say. If I need more work surface theres the sawhorses and some plywood to use temporarily. Perfect combination in my mind. Especially if you are a hobby woodworker like me and need to keep things to a minimum for space saving.
It’s great to see it’s such a two sided argument, I’m surprised at how balanced things are. It certainly seems that when it comes to tool wells you either love them or you hate them but as you know I’ve become very understanding of them of late.
It was interesting Mosquito when you brought up about surface space being at a premium and this goes together with my own experience of favouring a tool well when working on a shorter bench. If fact reading though you can get the idea that whether we like a tool well or not is actually closely related to our surrounding set up for tool storage. So those who don’t have a tool well tend to be able to store tools close to hand on a wall or alternate work surface, where as when we work solely off a short workbench the tool well becomes a blessing.
I’ve become a much tidier woodworker somehow since my hand tool workshop was moved in to the much smaller room where my only work surface is my Little John bench.
Charles, I definitely agree that we have essential tools that should always be kept to hand and this is what I’ve been loving the tool well for, I find they stay much more organised in the well than on the bench top.
Jeremy, I’ve really taken to your idea of the integrated removable wells for both workbench and tool chest. I’d love to give this a go just to slide one out and click it in to place… It’d have to click!
Thanks, Richard
Hi Richard
I too am a ‘Lumphammer man’ and am moving away from a tool well.
I’m presently designing a new bench. My old bench is a sort to David Charlesworth (furniture making techniques) inspired top, mounted on an even older low workbench. The size of the top was dictated by the timber I had at the time, its about 1500x790mm, with a 250mm wide tool well with removable three slding base panels. The well is way to WIDE, most of the pieces I assemble seem to end up with a component unsupported over the well, or the piece is covering the well so I can get to the tool beneath!
Where I rented a space before, the ‘Boss’ a boat builder, had two foot deep simple ply benches fixed to the wall for stability with a single vice. He got the tools he’d need for a job from the store room it a low A4 sized cardboard box, he could put this down anywhere next to the job in hand and get on, when that job phase was complete the tools went back to the store and so on. In this way he worked very efficiently.
With more timber this time round I’ll go longer, 2100mm, stick with the width but made up of two 375mm wide sections, with a central flip stop/removable board of say 40mm so I can still get a clamp in the middle when required. I will store tools in drawers beneath, accessable from both sides. I plan to only bring the tools needed for a task to the bench top, then replace them! There will be a gap between the bench top and the drawers of 100mm for the dog tails and clamping etc.
Fingers crossed this will up my efficiency!
Hi Julian, Pleased to hear someone else likes a heavy hammer! I do think that workbench design evolves as we get used to our own way of working and when it comes to the time of building a new bench it’s a great opportunity to take note of what does and doesn’t work for you, ready to make improvements. I like the idea of leaving a gap between the top of the bench and the drawers – that’s a good compromise to get both the storage and a very usable bench.
Cheers, Richard
Richard, An interesting post, not least because you invite comment and discussion.
Your photograph of an English style workbench brought back memories of the bench at which my Father taught me joinery. It was double sided so that my Grandfather could work on one side and my Father on the other. It had a tray in between but not, not ever for tools. My job, at 10 years old in the early 1950’s, was to keep the floor free of shavings and sawdust and to empty the shavings well. It was explained to me that tools should never, never ever, be in the well because they might be thrown out with the shavings and would be difficult to find when in the heat of flat out hand work. My Father would keep a cabinet makers brush in the pocket of his apron that he would use to brush shavings and chips into the well so that they did not end up marring the surfaces he was planing. They could not be swept to the floor because the frame, or whatever he was working on, would be in the way. He would also tip shavings into the tray from his planes with a flick of the wrist.
I built my own 6 foot long version of this bench largely because Chris Schwarz declared the English workbench to be an evolutionary dead end and I set out to prove he was wrong. I included a 3 foot long shavings well in the middle of its double width that sits between the rear aprons. This is 6 inches deep and can be lifted out to be emptied or to allow clamping access onto the rear aprons. Two shallow wells at both ends I use for small tools because they are so shallow that shavings do not hide them. A cover plate fits over these trays to give a continuous wide surface when I am carving or assembling.
I built a storage cabinet beneath the bench with a tambour door and drawers. However I left a 8 inch gap between the top of the cabinet and the work top so that I can clamp to the top and use hold downs and dogs. There is only a half inch gap between the floor and the bottom of the cabinet and this stops most wood waste getting underneath. The cabinet is screwed to the rails and trestles so hugely stiffen the whole bench while the tools it contains add a considerable amount of weight. Not that it realy needs this help as these components are 4 inch square Scots pine. If I were to make another I would so arrange it that the drawers could be accessed from both side of the bench although I have not often had to take work off the front apron to get at the tools in the cabinet.
I believe that the English bench is superior to other designs as the aprons and ribs form an extremely strong box section that ensure that the top is always held flat. The mistake oft made is to use thin material for the aprons as this does not allow clamps to be applied between the top and the bottom edge of the apron. You need inch and a quarter thick aprons as a minimum.
I find my bench excellent for joinery and cabinet work and particularly enjoy the fact that the apron front is so flat that I can use it as a straight edge. I seldom use my end vices and the dogs but plane against stops in the fast working way my Dad taught me. I do find them usefull to hold a sticking board or planks that I am rebating.
So yes Richard I love chip trays and storage cabinets under my English bench.
You have some fantastic stories Bernard, always a joy to read! The shavings tray sounds very efficient and must be the sign of a busy workshop – I imagine they kept you busy emptying.
I’m also a big fan of English style workbenches and I think they excel when you do the majority of your work against stops. I’ve very intrigued by all of the adaptations your made to your design, certainly not an evolutionary dead end! In my opinion the English design is at the height of workbench evolution.
As one who values the ability to work on any side of my bench, I found a Portable Workbench Tool Caddy that works.
The caddy is designed by Greg Brunk, of Cuyahoga Falls, Ohio, USA, a former technical designer & member of the Society of American Period Furniture Makers (SAPFM). Its illustration is found on the Fine Woodworking Members section at:
http://www.finewoodworking.com/workshop/tip/portable-workbench-tool-caddy.aspx
Although a membership is required, I believe you can sign-up for a trial period.
The caddy features a shallow tray for larger tools like hand planes, a scored block to hold a selection of scrapers, and custom-fitted slots to hang tools like chisels, mallets, and handsaws. The caddy is held in place by two dowels drilled & glued into through-holes in the tray’s bottom fit into consecutive dog holes found all around my bench top.
Ron:
Happen to see your comment about the toolbench cady, thanks for the comments I use the cady all the time and it seems like a no brainer. The tools just fall into the various slot widths and the benchtop is clear. again thanks
Greg
Before I had my current bench I always wished for a tool well. Now I’ve had my wish, I won’t want another. Everything I look for is in the well under something. Either shavings or the piece of wood I’ve just clamped down. Now the well spends most of it’s time filled in. A similar idea to what you have on the ‘Little John’. So my opinion, no well for me thank you.
Enjoying the vids by the way, well done.
Mark
My experience has been that tool wells just get cluttered with tools hidden under shavings – and as some of those have razor edges . . .
I’m happiest without a tool well – my bench is about 5′ long – but then I only do relatively small work
Oh dear – time to eat words having only just uttered them! Watching the videos I’m beginning to rethink my idea that I might ask for my bench with no tool well as an option. Having seen the bench in action as it were, I’m beginning to see the value of the well . . .
I have always used a tool well and found them useful but now need a new bench. Because so few work benches are sold in the UK with a tool well I’ll probably buy one without and mount a shelf/board behind for tools. I see Draper has one but the bench seems light. Ideally I would import one from Norway but it gets expensive http://www.hamran.no/hovelbenker/skolebenker
Also see how the front vice is offset – this is a great feature. Does anyone know if this design exists in the UK please?
sorry – bad link
http://www.hamran.no/høvelbenker
Tod Herrli built a narrow knock-down bench for traveling and solved the tool problem by running a french cleat along the entire length of the bench back. A tool caddy rode on the french cleat. It took half a blink to slide the caddy towards you or to shove it out of the way. This idea is similar to the pegged caddy mentioned by Ron Dennis, but is more adjustable. On the other hand, I’ve had issues using french cleats in other applications when the hung object could not be supported close to its bottom, which is the case here. I don’t remember if Tod did something clever or if the bench top is just thick enough to avoid the problem. My guess is that you want the box to extend up above the bench more than extending below, Just count on being able to easily slide it out of the way if needed.
I am undecided about wells. My current bench (piece o’ junk for other reasons) does not have a well and I feel lucky that I’ve not pushed anything important off the back side. Of course, I could mount a simple stop along the back of the bench to prevent that and make it possible to lower it, just in case there is something wide on the bench.
I’m only 5 years late to this discussion.
There’s a photo of a descendent of the bench here: http://villagecarpenter.blogspot.com/2011_05_04_archive.html It’s the first photo. I believe there are three separate caddies. You could hang as many you wish, or none, per your needs at the moment.
I wonder what that coffin smoother did to be banished and shoved under the bench?
Hi. I grew up around two amateur woodworkers all my life. My father was a good at all master of no trade, while my father-in-law was an excellent woodworker. and who taught me most. They both had workbenches with tool wells. The funny thing is that I only learnt that the name “tool well” a few years back when I started to take woodworking more seriously as a hobby (I am 56) and started browsing about these things. The thing is, my father in law didn’t use the tool well as a tool well. He kept only one thing in it: a Hand brush. With the brush he’d sweep all the sawdust and chippings into the well, and as far as I was always concerned, that was what it was for. Saws would be hung in the saw rack behind the well, other tools would be hung up or put elsewhere while working.