Hand planing wood by hand requires us to choose a technique that’s suitable for the specific job at hand, and doing this requires us to understand the wood, the tools and the project in question.
New To Hand Planing? Learn About The Different Types Of Hand Planes
Despite the daunting amount of work, large projects can be surprisingly good practice when learning how to hand plane wood effeciently, because you can often get away with looser tolerances and still end up with a decent result.
Practicing to take shavings is a good first stage when you’re new to hand planes, but I’d encourage you to experience things in the context of a project as soon as you can, because that’s when you’ll get a real grasp of techniques.
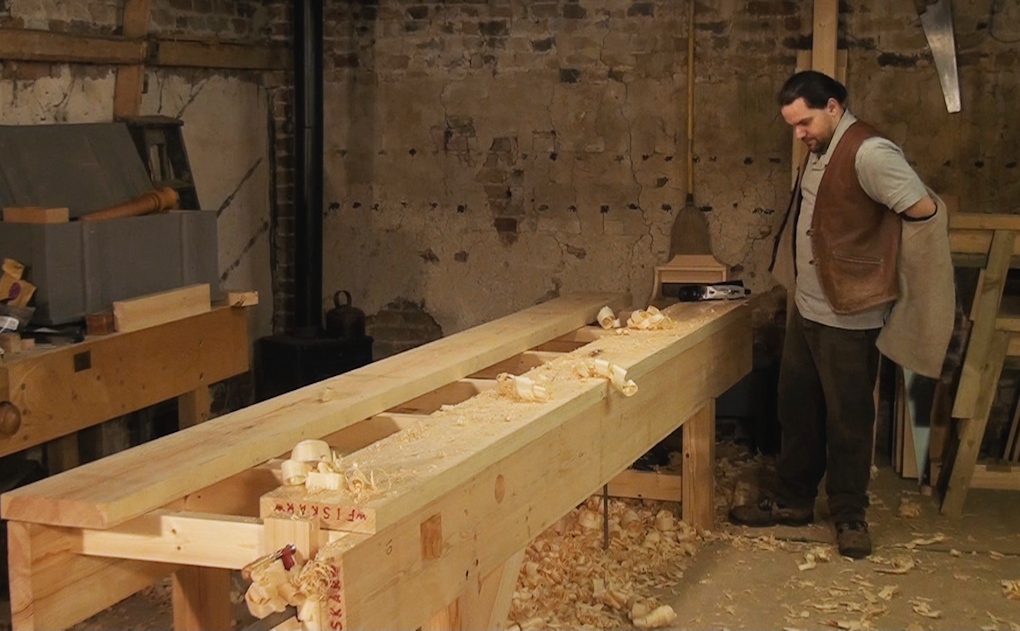
This video shows the surface planing (or tarting up) for the underside of one of the top boards for my English Workbench, a very large project.
In this case the wood has a big hump right down it’s centre. The board is very long and flexible so I needn’t worry too much about straightness along it’s length, and being the underside there’s also no need to aim for a perfect finish.
So the goal here is to flatten the board along it’s width and remove that hump. A very slight cup down the centre would also be acceptable, but leaving any of that hump, even slightly would prevent the board from sitting flat upon the frame of the bench.
With this understanding of the intension of the piece, and it’s relation to other parts, you can govern your tolerance and know where you can loose it.
This is not rough, but essential.
![Bench Top Edge Jointing [with Video]](https://www.theenglishwoodworker.com/wp-content/uploads/2022/10/bench-top-edge-jointing-video.jpg)


Very wise to set a goal before tiring yourself. The pace is good, as is the result.
Now there’s two more things you need:
1. An Executive Broomstick Manager 🙂
2. A handful of small wedges. A board that’s rocking under your plane takes up energy too. Not just the mass moving/stopping and the tension in the board. It also disturbs the balance in the plane, so the small muscles keep the brain busy and vice versa.
Oh, and 3rd, a cuppa tea of course.
Wise words there Jasper, thanks. But I think we should up the 3rd to a pot!
This looks like a Redwood not the Popular you were buying?
It plains well and I bet it smells nice; I expect your second jacket is hanging up now, your doing a good job there.
Thanks Michael,
Yep this is redwood well spotted. Saying that I bet you can smell it through the screen can’t you!
This was for the workbench build, but the poplar is coming in for some prototypes I’m working on at the mo. I’ve been very impressed with it but do miss the smell!
Redwood? Doesn’t look like sequoia sempervirens to me. (If it is, it is the lightest in color I’ve ever seen.)
Is this another example of two countries separated by a common language?
Yes to the “common language” question. In the UK commonly-available softwoods are sold as whitewood and redwood, with redwood generally a better quality. Whitewood is also known as SPF – spruce/pine/fir/whatever and is often knotty and prone to twist and cup. Redwood is typically Scandinavian pine, straighter grain and fewer knots, and gives up that beautiful piney aroma as you work it.
I see you have no need for workshop heating! This reminds me I have to hand plane 35 Sq Mts of Oak for or next floor! Did you have a convex curve on your iron? It looked like it from the shavings.
Blooming Nora Chris, that may as well be 35 miles!
It’s always hit and miss with heating as once you get planing you don’t want it, then you do some marking out and need to go fire the stove up.
Yes, it has a camber on the iron, although for just general prepping I don’t go too heavy.
Excellent video, Richard. “Economy of effort” is a phrase that comes to mind when watching the way you work.
Thank You Richard for all your videos. You are always informative and a joy to watch. Patrick Moore
No, can we have a third set of “fresh muscles to use?” Or, maybe the mouse could help? 🙂
As always, the practical perspective on the effort -vs- usefulness can’t be mentioned too often.
THANKS!
I am building a work bench also. Unfortunately, not one like yours as I started before I found this wonderful resource.
I have been using a thicknesser for preparing my lumber but bugger me it is a screamer. I think I will go and try the hand plane approach, so thank you for the tips
cheers
Kyle
I enjoyed your watching your workbench video it was well throughout and executed. This work bench is a good solid bench and I’m going to base my next bench on this design.
You know, it’s always that last bit – taking the full length shaving – that screws up the flatness of the surface I just made.
I’ve decided to live without it. It’s rough. I like it rough. Because I’ll never see it again.
Does it help if you set the plane for a lighter cut, and use less pressure?
Anyway, rough is fine. That’s not a contradiction.
Hi Richard,
I’ve seen this part of your video series several times before I started to plane my new bench top.
Although I’ve made a laminated one out of beams I tried to follow your advise.
To be honest. to prepare my first bench top was not the most wonderful experience I made. But every time when it started to get difficult I recalled these hints in memory and tried to follow them.
After a few hours of tiring hand planing and sweating like a …. I was done.
Is it 100% flat, No, not yet. Does it look flat? Yes it does 🙂
All your advise was really help- and meaningful. So thanks for this.
Cheers,
Stefan
Hiya,
Just found your vids on you tube etc. and I must say it is a breath of fresh air to see your work area after watching all these American guys with there immaculate w’shops.
I myself, new to woodwork in my retirement work in a 10’x8′ shed, sorry, workshop, but it’s home.
I have watched your vids on plane set up and like very much, but not having the money to buy good woods I struggle with ‘knotty pine’ and ply wood.
So the question is do you have any useful advise for using the materials or can you point me in the right direction?
Great job Richard, as usual I always enjoy watching your videos waiting for other vids to come up.
A questions from a total beginner!
What’s you tolerance when you check for straightness with the edge of your plane along the board? So far when I’ve prepped a board I’m just aiming to take out any humps that cause the plane to rock but should i be aiming higher?!
Cheers, really enjoying your videos.